Appearance
第9章 多平台集成
💡 本章目标:学会将OpenClaw接入飞书、企业微信、钉钉、QQ等国内主流平台,实现随时随地使用AI助手。飞书作为最现代化、开发友好的平台,将优先介绍。
📱 本章内容
- 9.1 飞书Bot配置
- 9.1.1 飞书机器人介绍
- 9.1.2 快速开始
- 9.1.3 创建飞书应用
- 9.1.4 配置 OpenClaw
- 9.1.5 启动并测试
- 9.1.6 访问控制
- 9.1.7 群组配置
- 9.1.8 获取群组/用户 ID
- 9.1.9 高级配置
- 9.1.10 多账号配置
- 9.1.11 多 Agent 配置
- 9.1.11.1 配合飞书使用
- 9.1.11.2 实战案例:4个专业助手
- 9.1.11.3 配置注意事项
- 9.1.11.4 故障排查
- 9.1.11.5 配置对比
- 9.1.11.6 使用建议
- 9.1.11.7 本地多 Agent 管理(无需绑定 IM 平台)⭐新增
- 9.2 企业微信Bot配置
- 9.3 钉钉Bot配置
- 9.4 QQ Bot配置
9.1 飞书Bot配置
💡 状态:生产就绪,支持机器人私聊和群组,使用 WebSocket 长连接模式接收消息。
9.1.1 飞书机器人介绍
飞书的优势:
现代化办公
- 文档协作
- 多维表格
- 视频会议
高效沟通
- 消息卡片
- 互动组件
- 流式输出
开发友好
- API设计优秀
- 文档详细
- WebSocket长连接
免费使用
- 功能强大
- 稳定可靠
9.1.2 快速开始
添加飞书渠道有两种方式:
方式一:通过安装向导添加(推荐)
如果您刚安装完 OpenClaw,可以直接运行向导:
bash
openclaw setup
```text
向导会引导您完成:
1. 创建飞书应用并获取凭证
2. 配置应用凭证
3. 启动网关
✅ **完成配置后**,您可以使用以下命令检查网关状态:
```bash
openclaw gateway status # 查看网关运行状态
openclaw logs --follow # 查看实时日志
```text
**方式二:通过命令行添加**
如果您已经完成了初始安装,可以用以下命令添加飞书渠道:
```bash
openclaw channels add
```text
然后根据交互式提示选择 Feishu,输入 App ID 和 App Secret 即可。
✅ **完成配置后**,您可以使用以下命令管理网关:
```bash
openclaw gateway status # 查看网关运行状态
openclaw gateway restart # 重启网关以应用新配置
openclaw logs --follow # 查看实时日志
```text
### 9.1.3 第一步:创建飞书应用
#### 1. 打开飞书开放平台
访问 [飞书开放平台](https://open.feishu.cn/app),使用飞书账号登录。
> 💡 **Lark(国际版)**:请使用 https://open.larksuite.com/app,并在配置中设置 `domain: "lark"`。
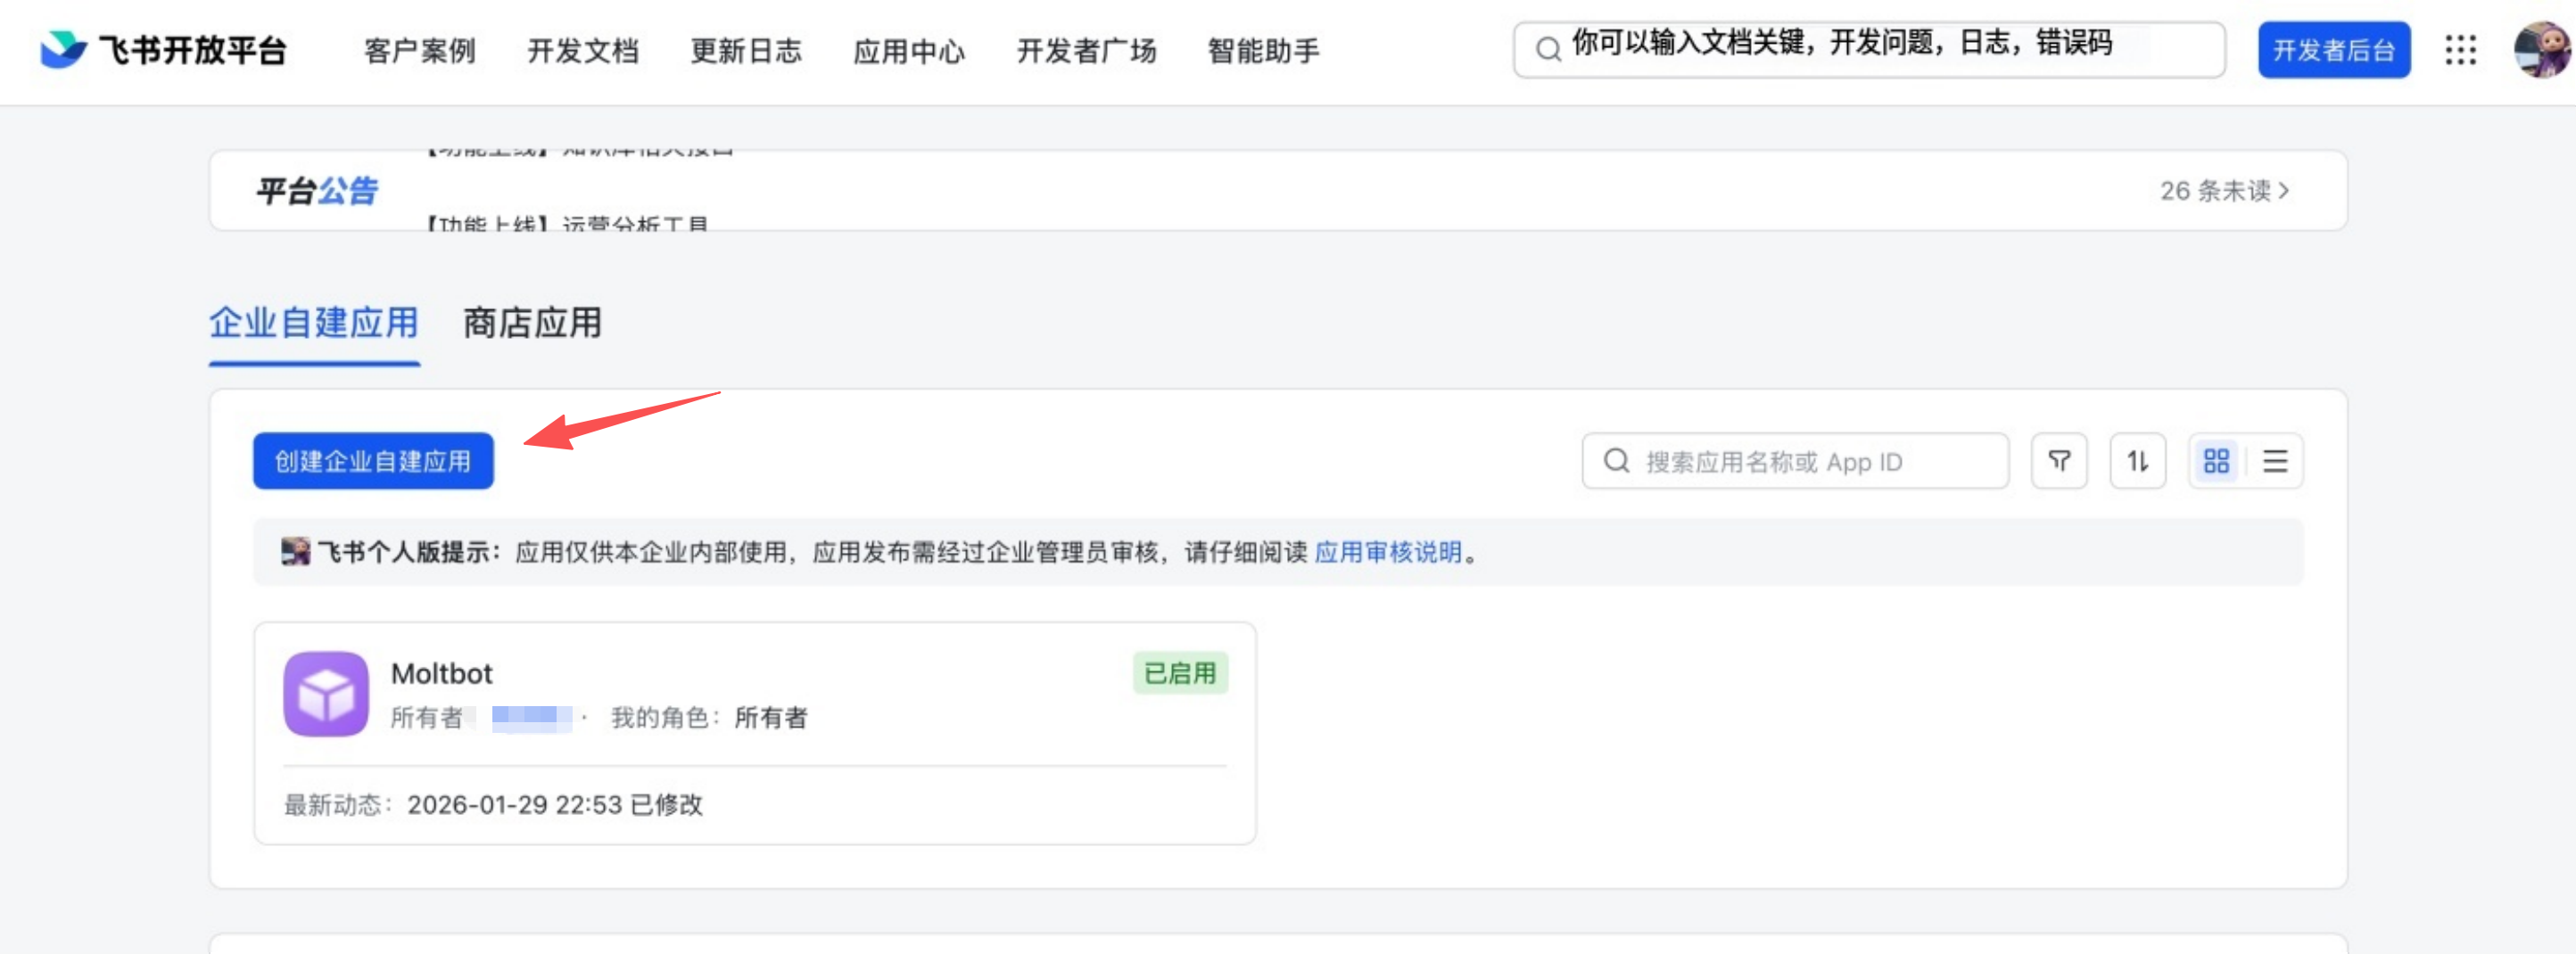
#### 2. 创建应用
1. 点击 **创建企业自建应用**
2. 填写应用名称和描述
3. 选择应用图标
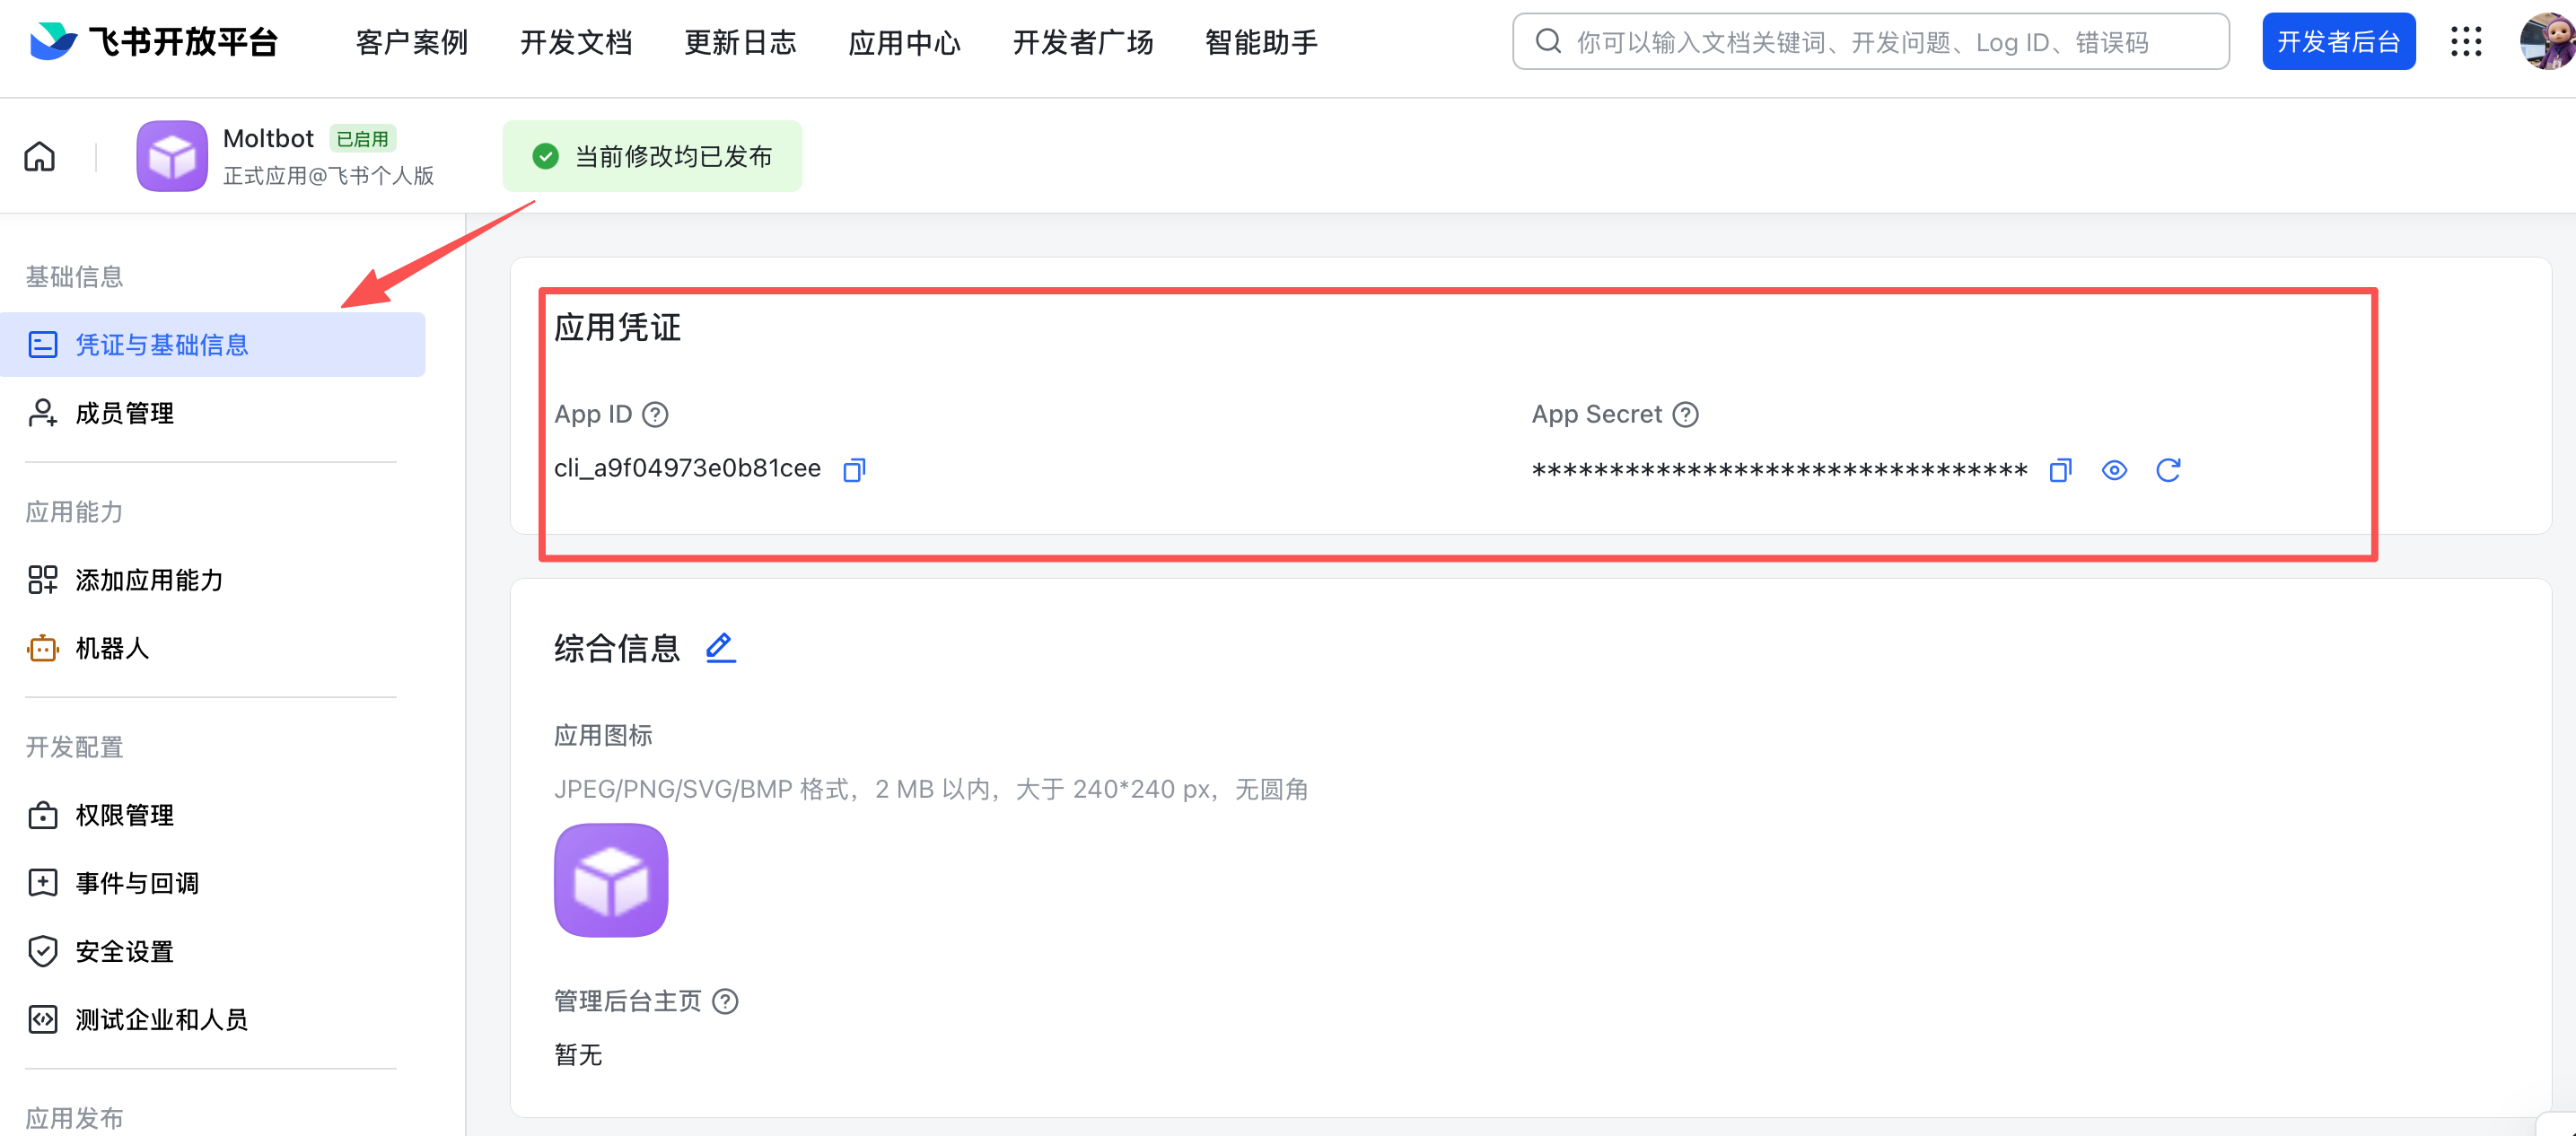
#### 3. 获取应用凭证
在应用的 **凭证与基础信息** 页面,复制:
- **App ID**(格式如 `cli_xxx`)
- **App Secret**
❗ **重要**:请妥善保管 App Secret,不要分享给他人。
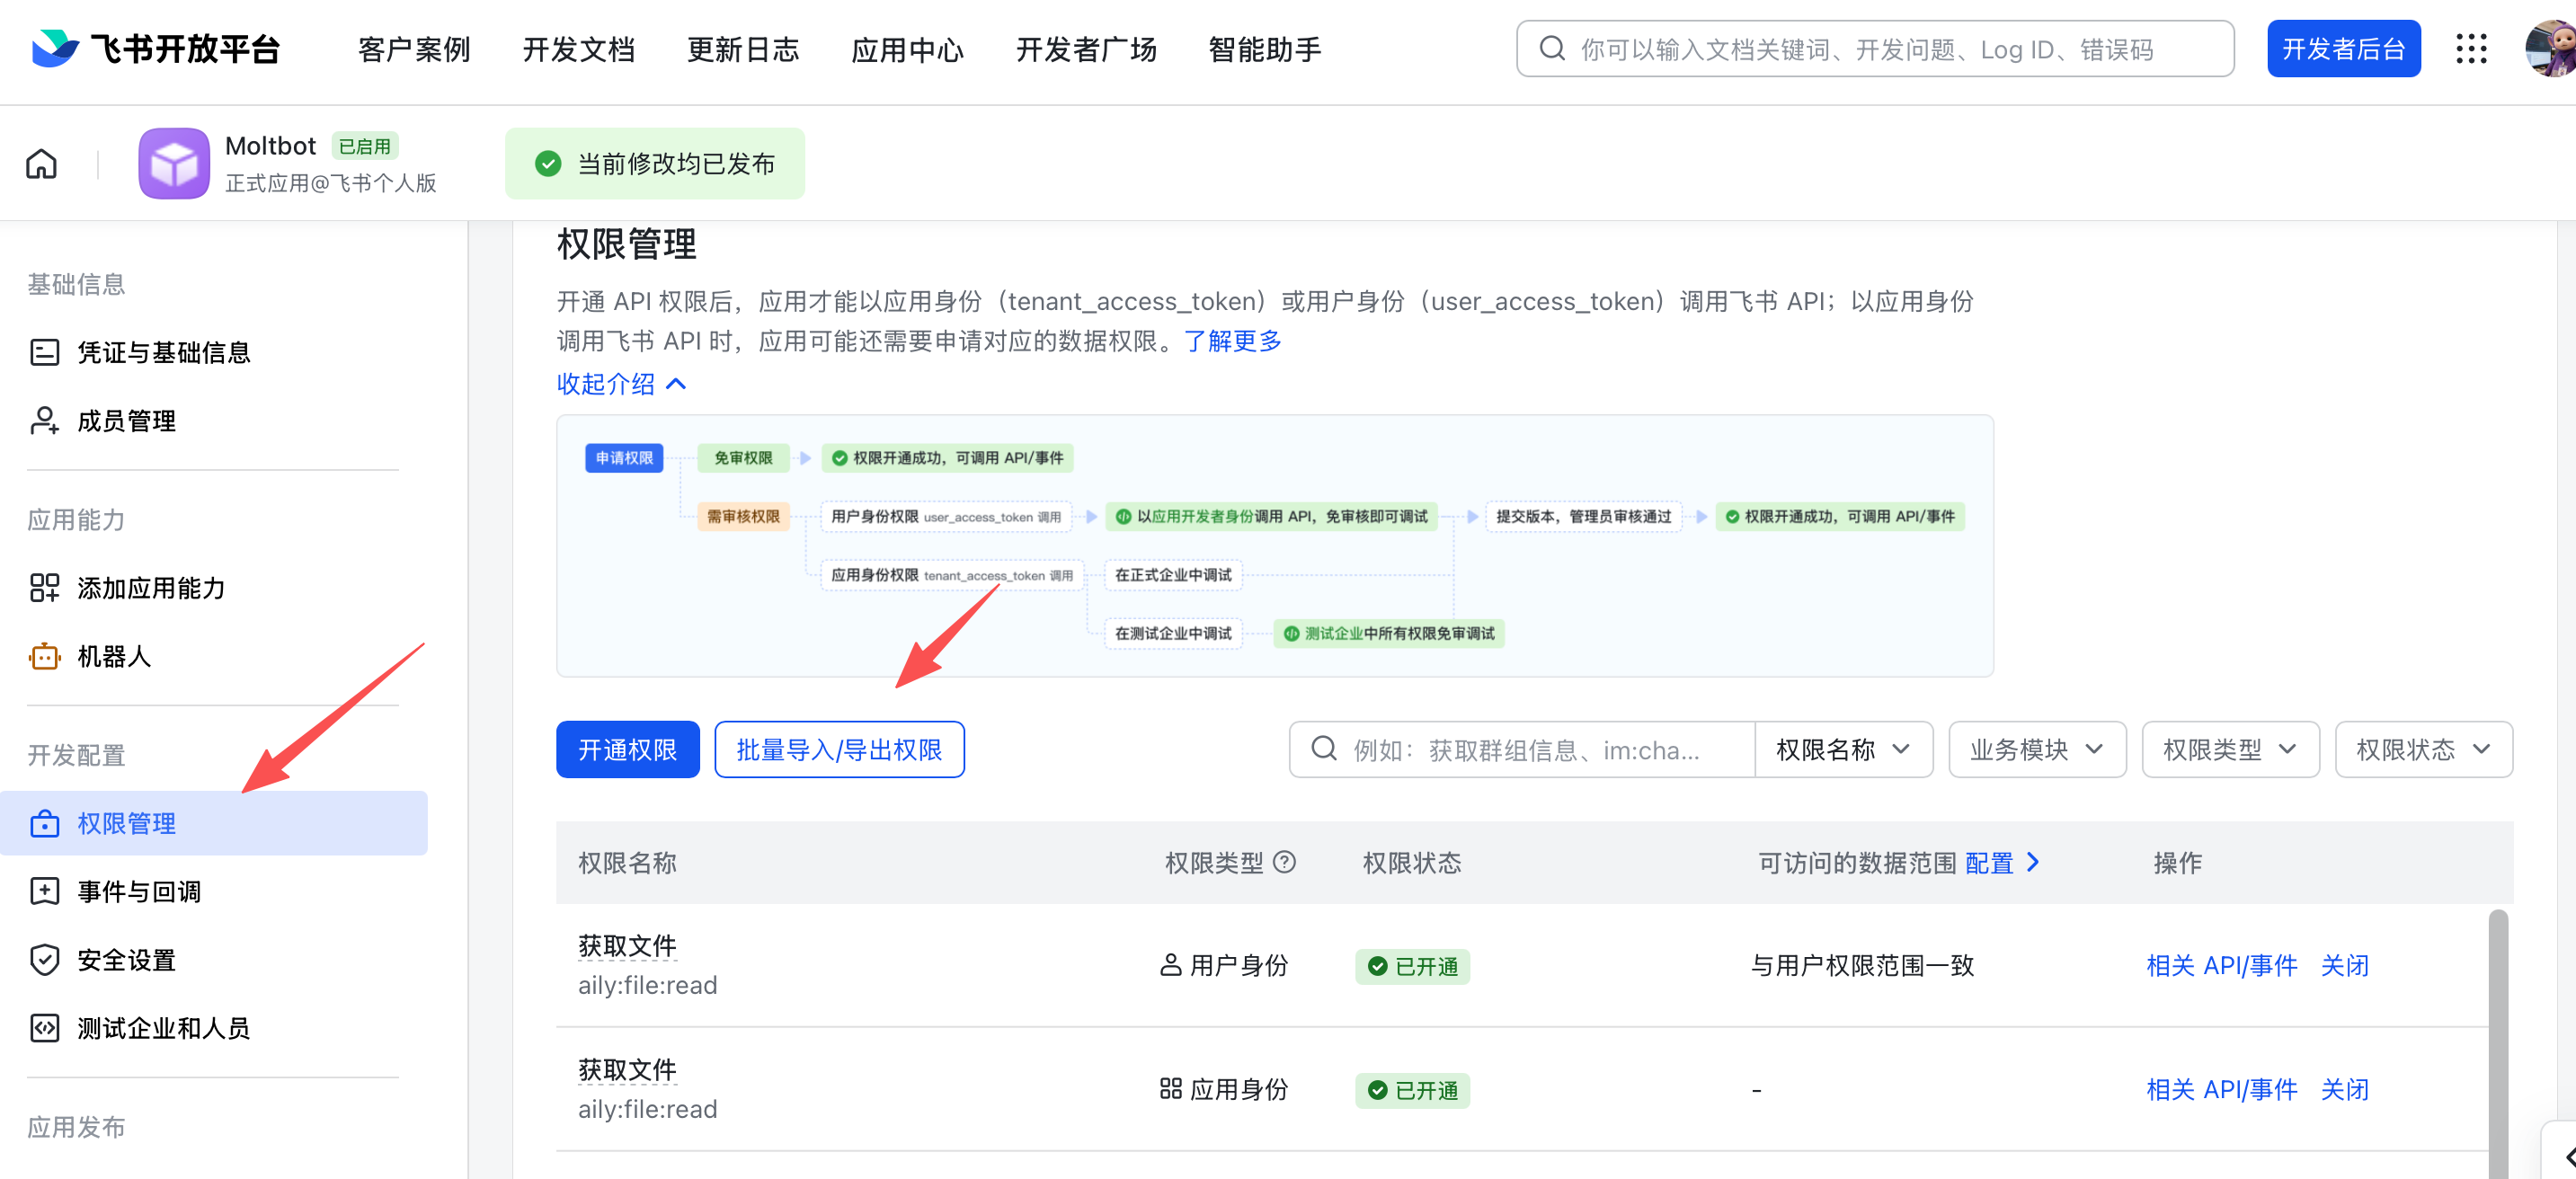
#### 4. 配置应用权限
在 **权限管理** 页面,点击 **批量导入** 按钮,粘贴以下 JSON 配置一键导入所需权限:
```json
{
"scopes": {
"tenant": [
"aily:file:read",
"aily:file:write",
"application:application.app_message_stats.overview:readonly",
"application:application:self_manage",
"application:bot.menu:write",
"cardkit:card:write",
"contact:user.employee_id:readonly",
"corehr:file:download",
"docs:document.content:read",
"event:ip_list",
"im:chat",
"im:chat.access_event.bot_p2p_chat:read",
"im:chat.members:bot_access",
"im:message",
"im:message.group_at_msg:readonly",
"im:message.group_msg",
"im:message.p2p_msg:readonly",
"im:message:readonly",
"im:message:send_as_bot",
"im:resource",
"sheets:spreadsheet",
"wiki:wiki:readonly"
],
"user": [
"aily:file:read",
"aily:file:write",
"im:chat.access_event.bot_p2p_chat:read"
]
}
}
```text
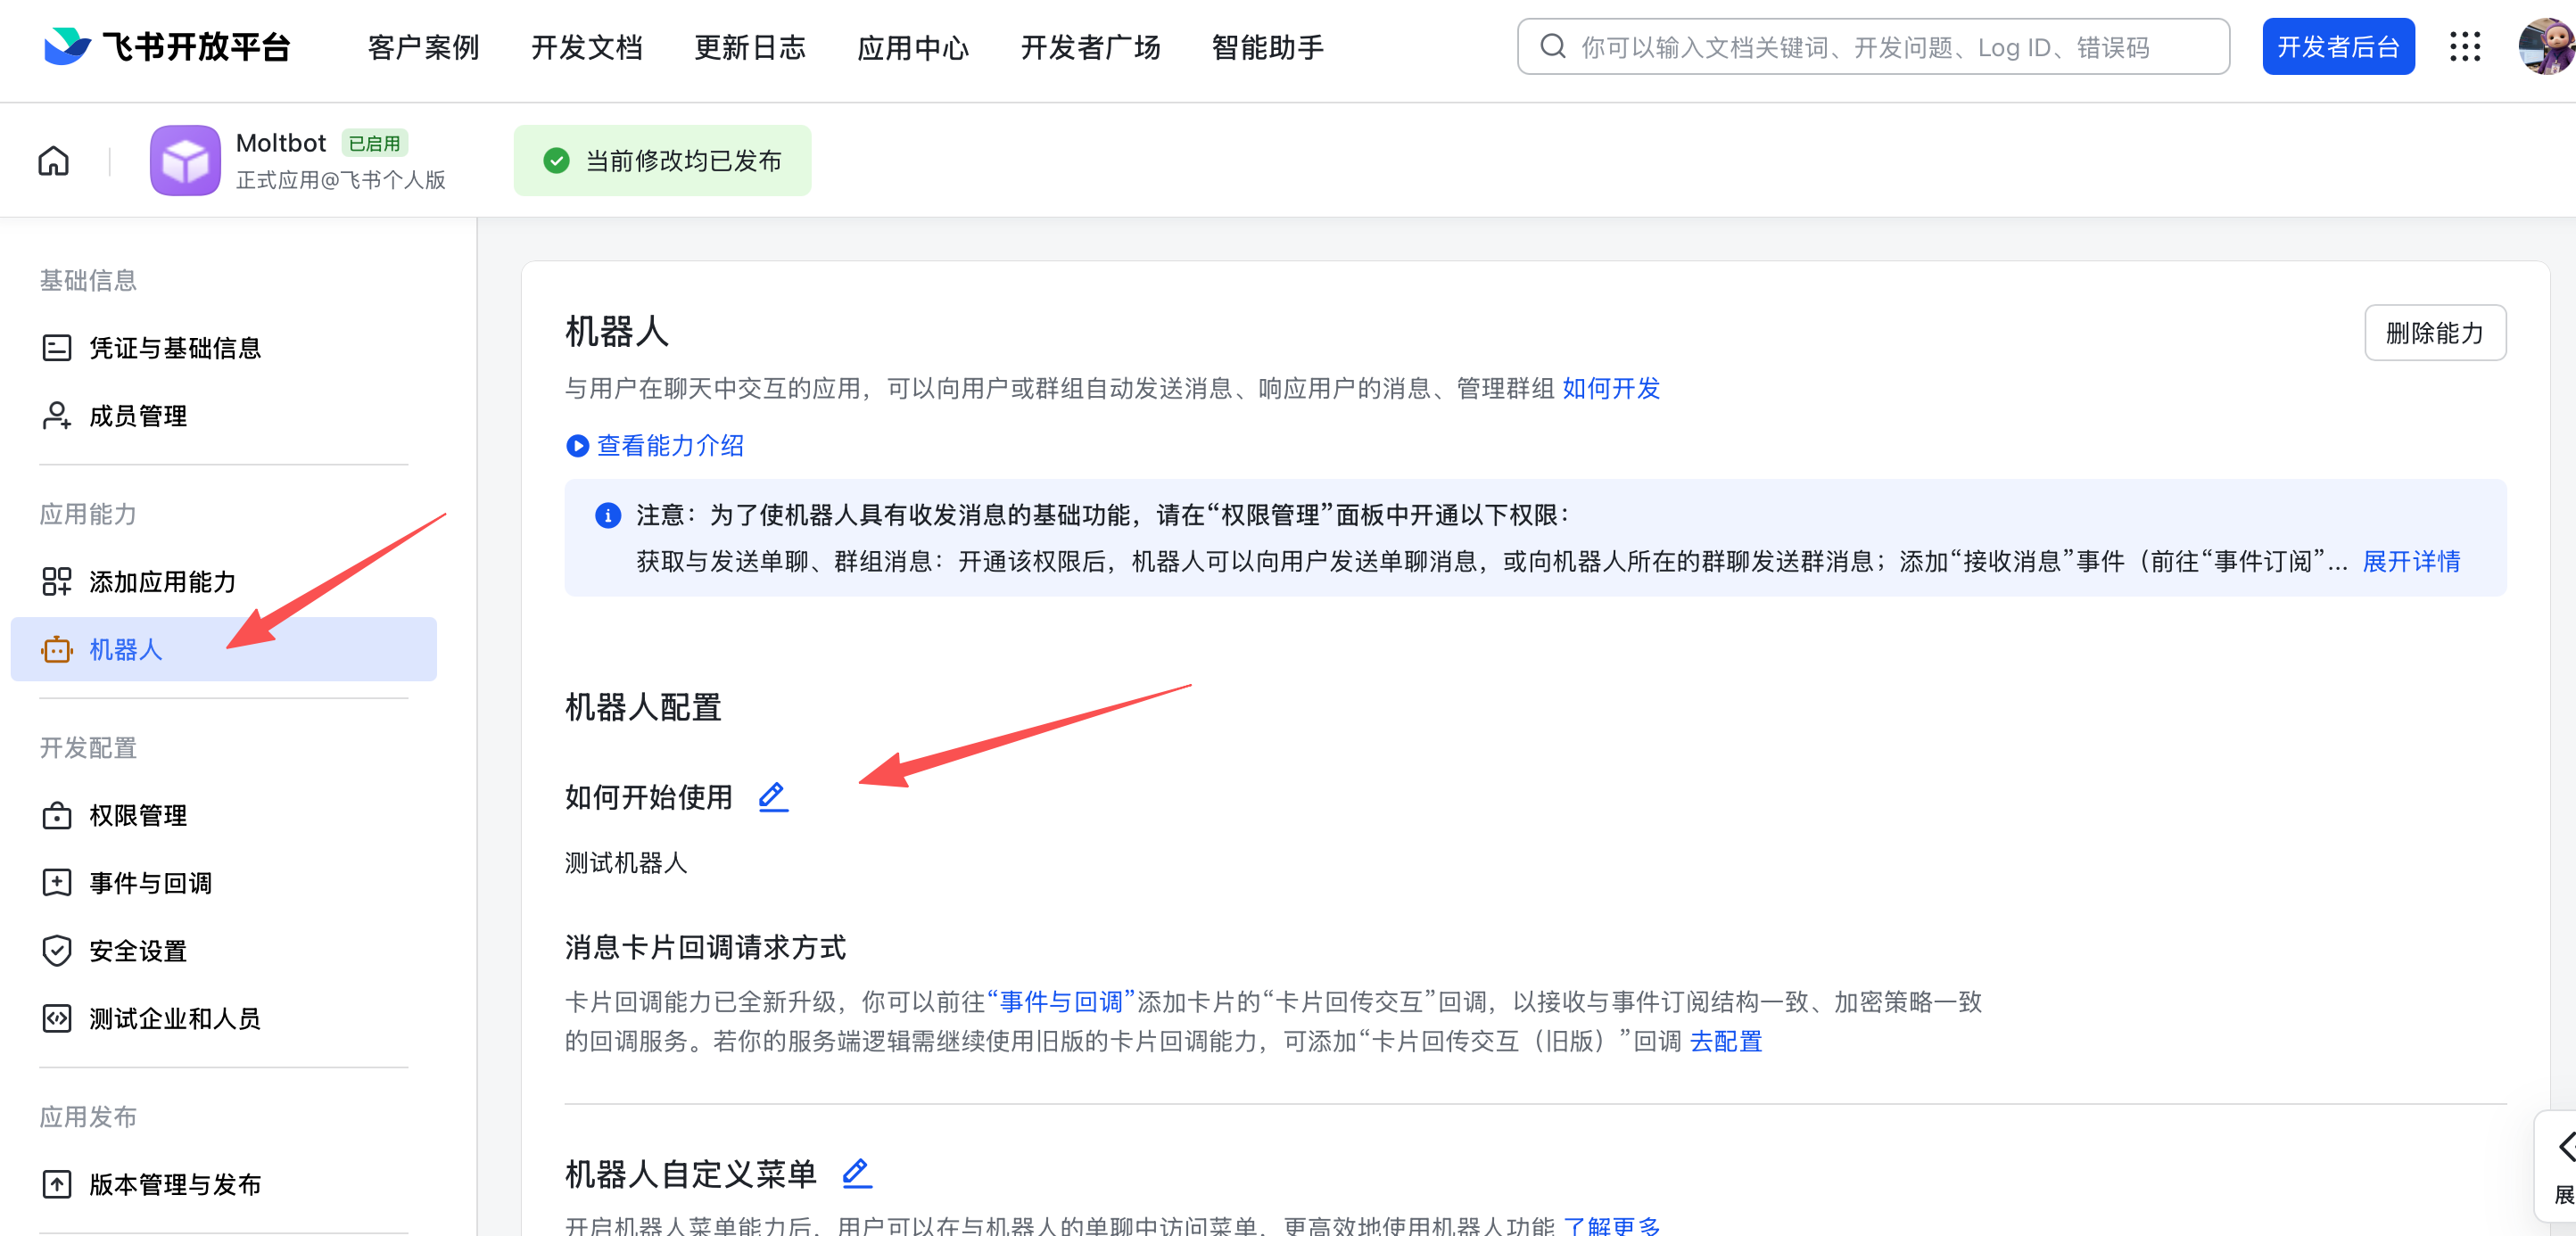
#### 5. 启用机器人能力
在 **应用能力** > **机器人** 页面:
1. 开启机器人能力
2. 配置机器人名称
#### 6. 配置事件订阅
⚠️ **重要提醒**:在配置事件订阅前,请务必确保已完成以下步骤:
1. 运行 `openclaw channels add` 添加了 Feishu 渠道
2. 网关处于启动状态(可通过 `openclaw gateway status` 检查状态)
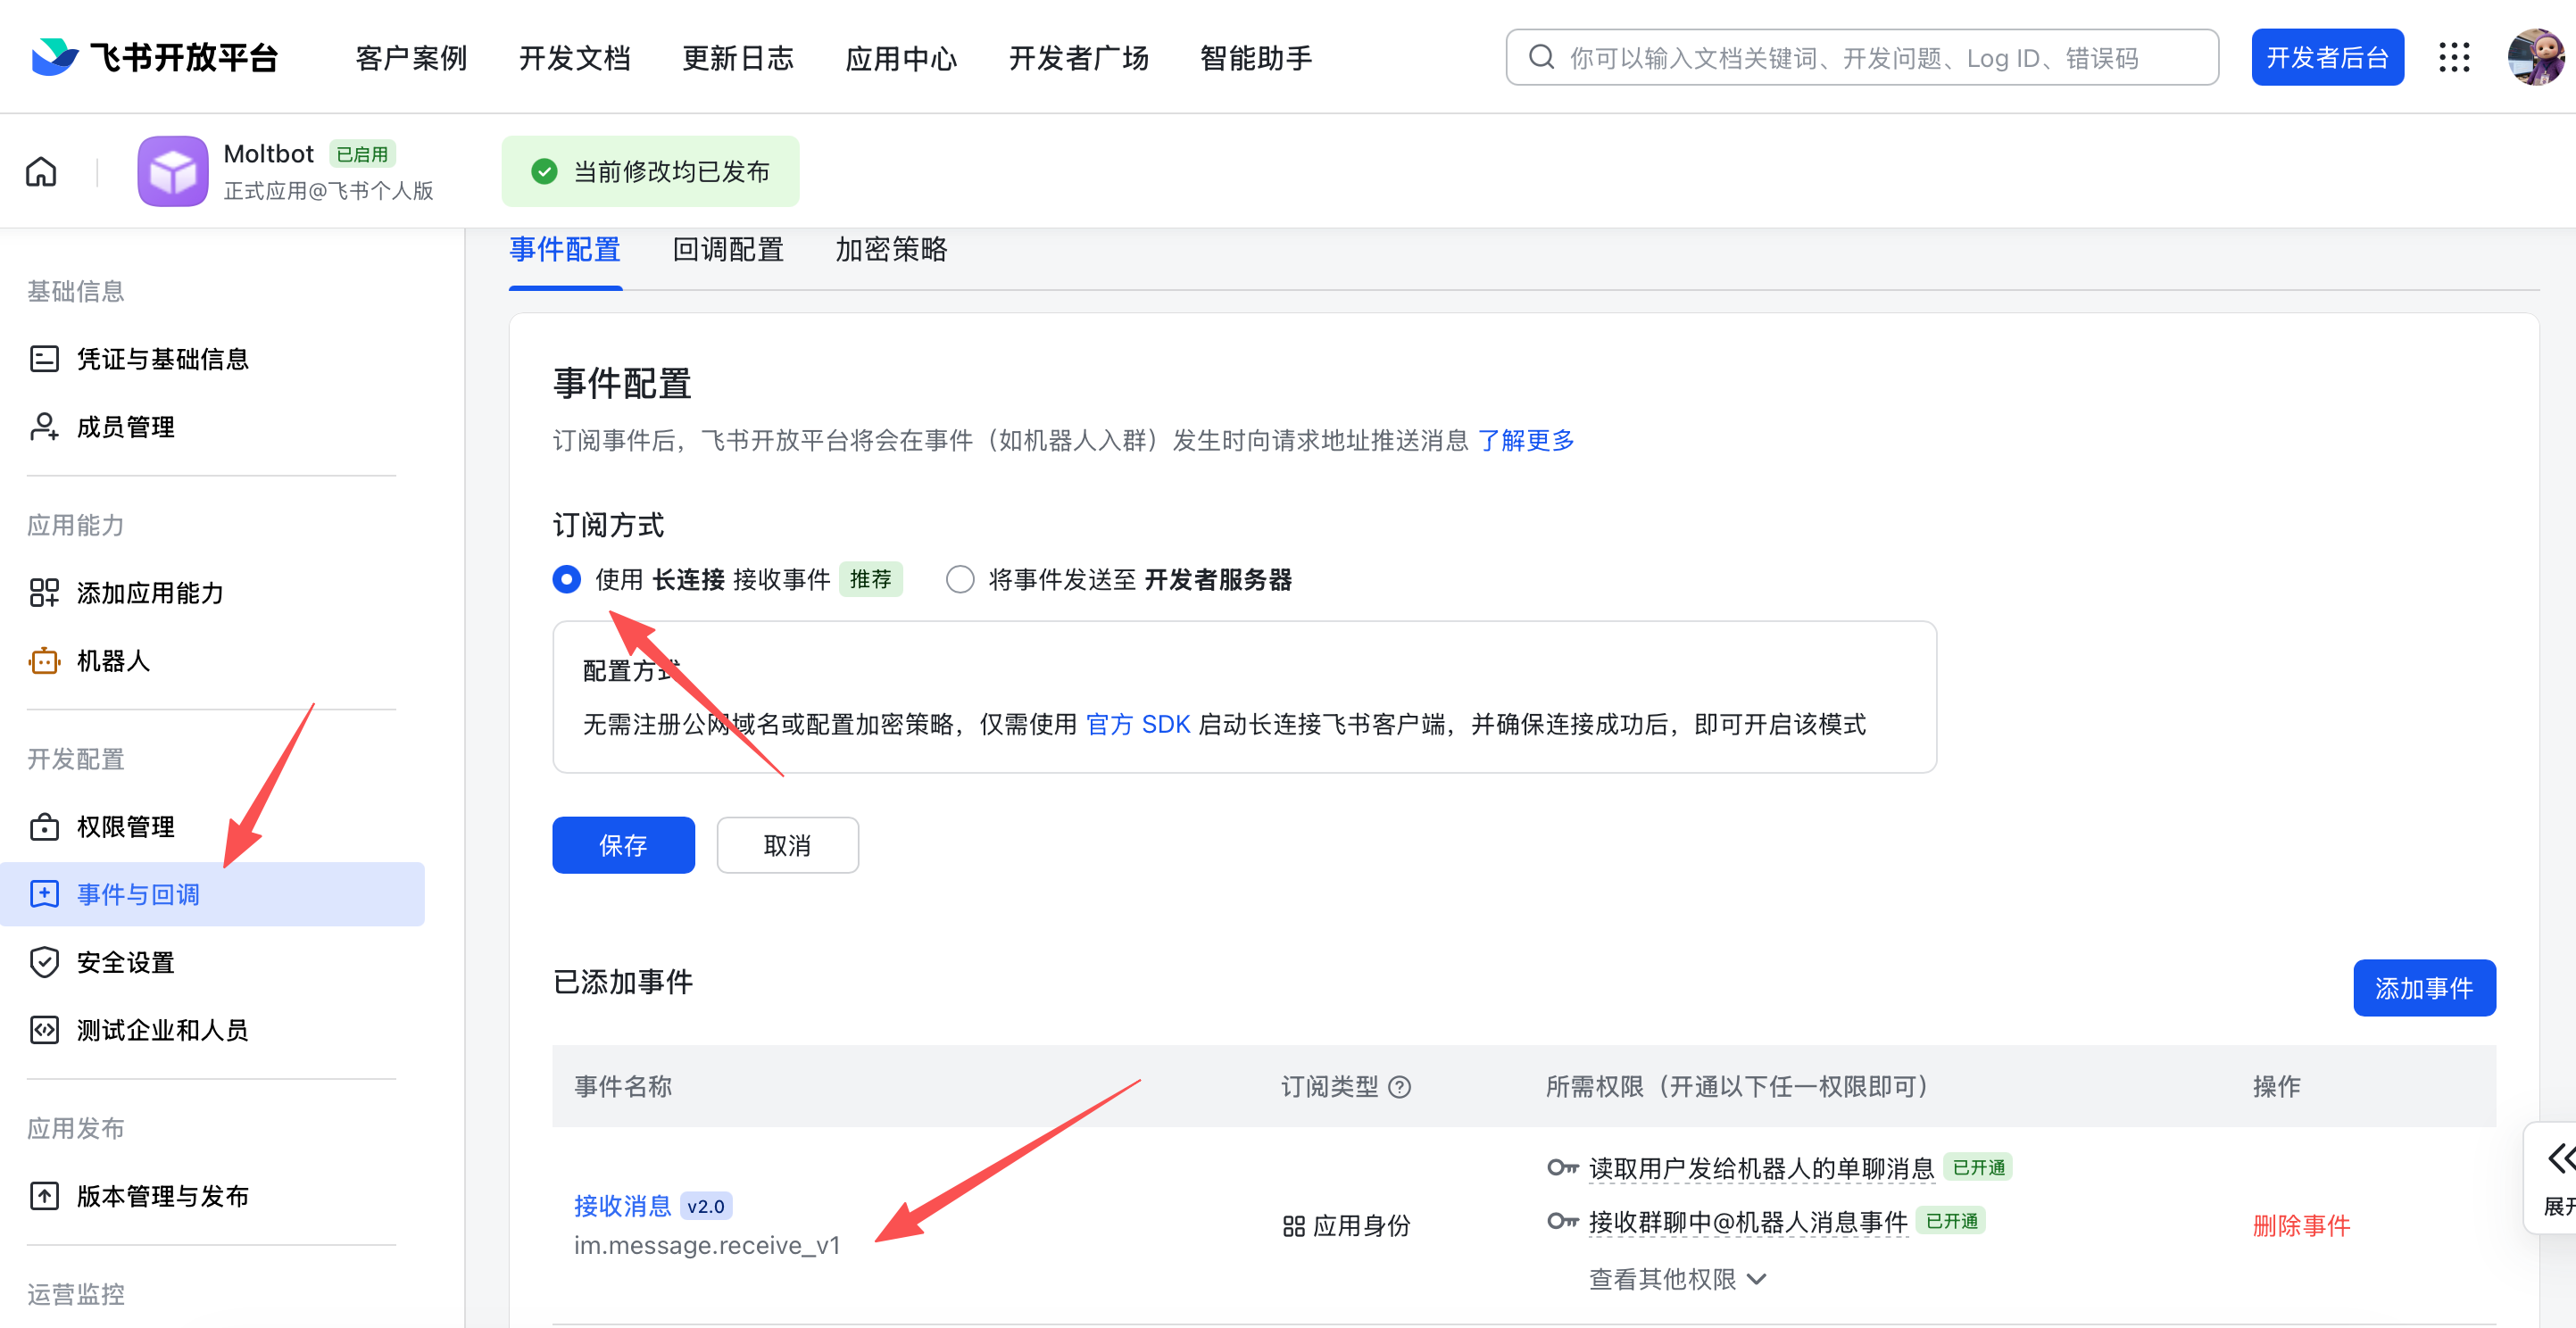
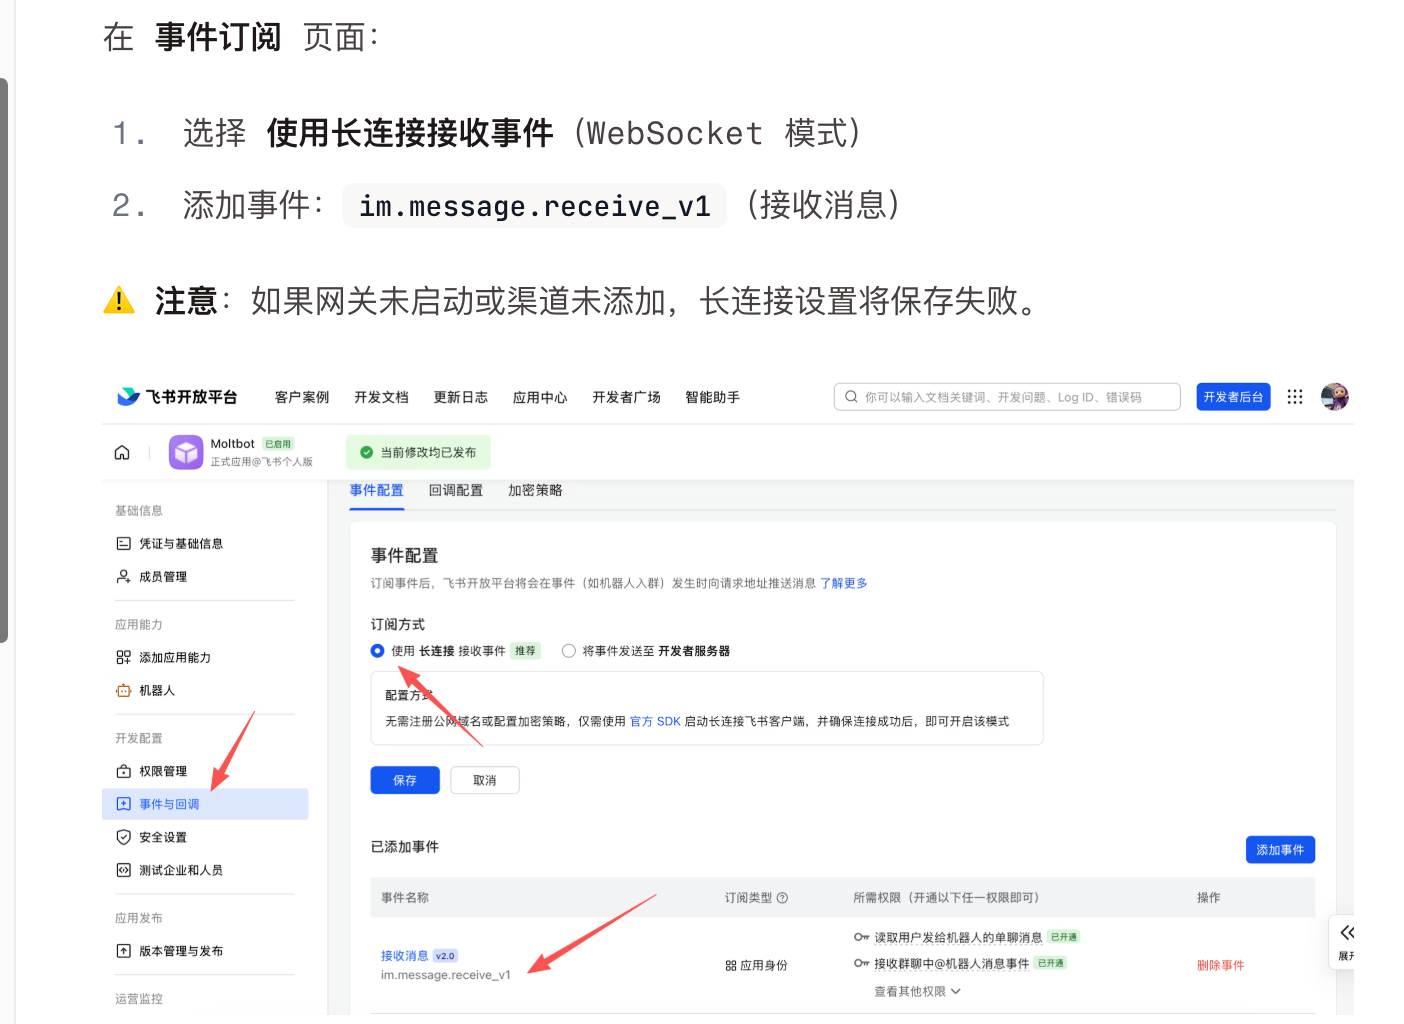
在 **事件订阅** 页面:
**步骤1:选择长连接模式**
1. 选择 **使用长连接接收事件**(WebSocket 模式)
**步骤2:添加事件**
2. 添加事件:`im.message.receive_v1`(接收消息)
**步骤3:配置必需权限(重要)**
在配置事件订阅的同时,请确保在 **权限管理** 页面已添加以下权限:
| 权限标识 | 权限名称 | 是否必需 | 说明 |
|---------|---------|---------|------|
| `im:message` | 获取与发送单聊、群组消息 | ✅ 必需 | 接收和发送消息 |
| `im:message:send_as_bot` | 以应用身份发消息 | ✅ 必需 | 以机器人身份回复 |
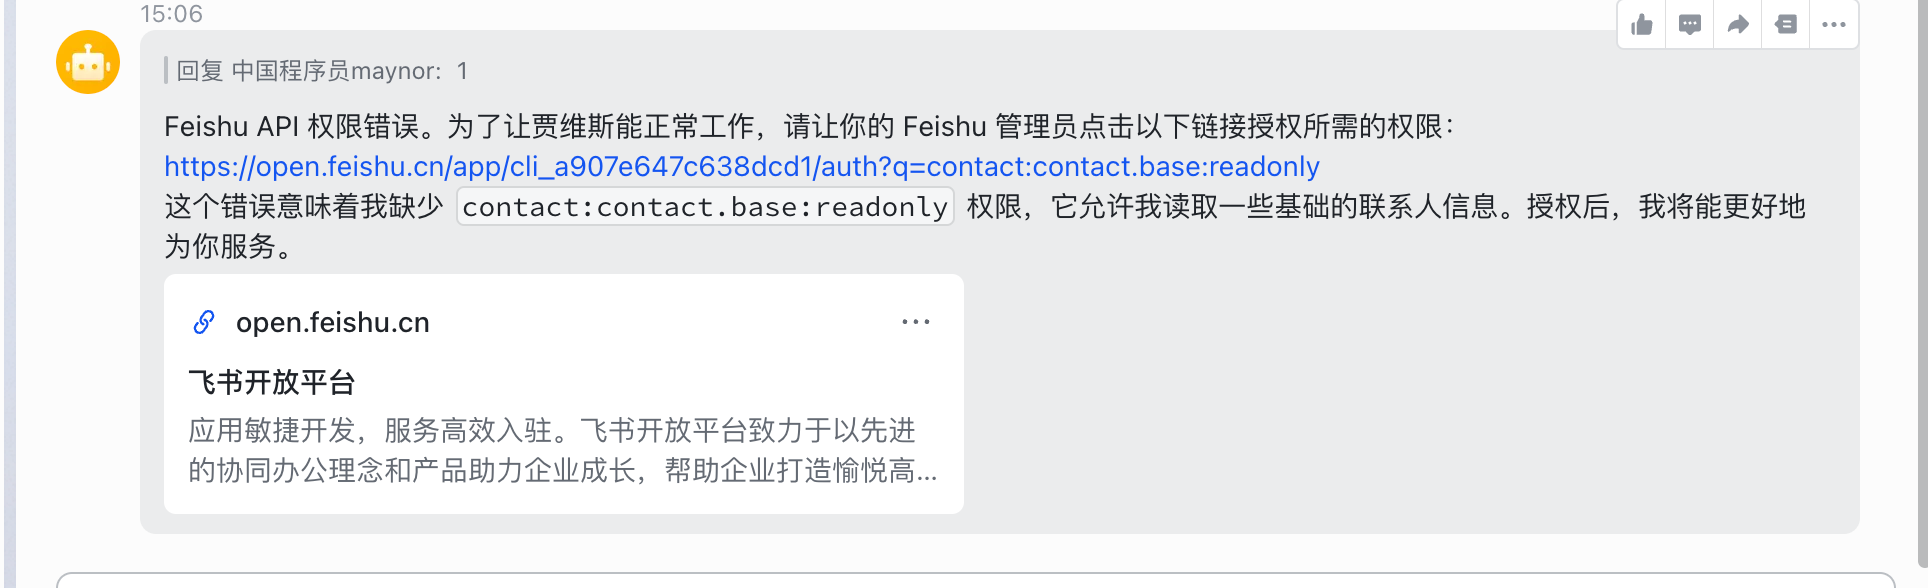
| `contact:contact.base:readonly` | 获取通讯录基本信息 | ✅ 必需 | 识别用户身份 |
> 💡 **为什么需要 `contact:contact.base:readonly` 权限?**
>
> 这个权限用于获取用户的基本信息(如用户名、部门等),OpenClaw需要这些信息来:
> - ✅ 识别消息发送者
> - ✅ 实现访问控制(allowlist/denylist)
> - ✅ 提供个性化服务
> - ✅ 记录对话历史
>
> ⚠️ **如果缺少此权限,机器人将无法正常响应消息!**
**配置截图示例**:

⚠️ **注意**:如果网关未启动或渠道未添加,长连接设置将保存失败。
**常见错误排查:**
如果遇到 "Gateway start blocked: set gateway.mode=local" 错误:
```bash
# 确保配置文件中设置了 gateway.mode
{
"gateway": {
"mode": "local"
}
}
```text
如果遇到 "Gateway auth is set to token, but no token is configured" 错误:
```bash
# 方式1:在配置文件中设置 token
{
"gateway": {
"auth": {
"mode": "token",
"token": "your-secure-token"
}
}
}
# 方式2:使用环境变量
export OPENCLAW_GATEWAY_TOKEN="your-secure-token"
```text
#### 7. 发布应用
1. 在 **版本管理与发布** 页面创建版本
2. 提交审核并发布
3. 等待管理员审批(企业自建应用通常自动通过)
### 9.1.4 第二步:配置 OpenClaw
#### 安装 Feishu 插件
```bash
# 安装 Feishu 插件
openclaw plugins install @openclaw/feishu
# 本地 checkout(在 git 仓库内运行)
openclaw plugins install ./extensions/feishu
```text
#### 通过向导配置(推荐)
运行以下命令,根据提示粘贴 App ID 和 App Secret:
```bash
openclaw channels add
```text
选择 **Feishu**,然后输入您在第一步获取的凭证即可。
#### 通过配置文件配置
编辑 `~/.openclaw/openclaw.json`:
```json
{
"channels": {
"feishu": {
"enabled": true,
"dmPolicy": "pairing",
"accounts": {
"main": {
"appId": "cli_xxx",
"appSecret": "xxx",
"botName": "我的AI助手"
}
}
}
}
}
```text
#### 通过环境变量配置
```bash
export FEISHU_APP_ID="cli_xxx"
export FEISHU_APP_SECRET="xxx"
```text
#### Lark(国际版)域名配置
如果您的租户在 Lark(国际版),请设置域名为 `lark`:
```json
{
"channels": {
"feishu": {
"domain": "lark",
"accounts": {
"main": {
"appId": "cli_xxx",
"appSecret": "xxx"
}
}
}
}
}
```text
### 9.1.5 第三步:启动并测试
#### 1. 启动网关
```bash
# 安装并启动网关
openclaw gateway install
# 检查网关状态
openclaw gateway status
# 查看实时日志
openclaw logs --follow
```text
**网关启动成功的标志:**✅ Gateway: running (pid xxxxx, state active) ✅ Gateway target: ws://127.0.0.1:18789 ✅ Source: local loopback
text
#### 2. 发送测试消息

在飞书中找到您创建的机器人,发送一条消息,例如:"hi"。

**在日志中应该能看到:**
HEARTBEAT_OK hi connected | running agent main | session main (heartbeat) | local-antigravity/gemini-3-pro-high
text
#### 3. 配对授权
默认情况下(`dmPolicy: "pairing"`),机器人会回复一个 **配对码**。您需要批准此代码:
```bash
# 查看待审批的配对请求
openclaw pairing list feishu
# 批准配对(替换 <配对码> 为实际收到的代码)
openclaw pairing approve feishu <配对码>
# 示例
openclaw pairing approve feishu ABC123
```text
批准后即可正常对话。
**如果不想使用配对模式:**
```json
{
"channels": {
"feishu": {
"dmPolicy": "open",
"allowFrom": ["*"]
}
}
}
```text
### 9.1.6 访问控制
#### 私聊访问
**默认策略**:`dmPolicy: "pairing"`,陌生用户会收到配对码
**批准配对**:
```bash
openclaw pairing list feishu # 查看待审批列表
openclaw pairing approve feishu <CODE> # 批准
```text
**白名单模式**:通过 `channels.feishu.allowFrom` 配置允许的用户 Open ID
#### 群组访问
**1. 群组策略**(`channels.feishu.groupPolicy`):
- `"open"` = 允许群组中所有人(默认)
- `"allowlist"` = 仅允许 `groupAllowFrom` 中的用户
- `"disabled"` = 禁用群组消息
**2. @提及要求**(`channels.feishu.groups.<chat_id>.requireMention`):
- `true` = 需要 @机器人才响应(默认)
- `false` = 无需 @也响应
### 9.1.7 群组配置示例
#### 允许所有群组,需要 @提及(默认行为)
```json
{
"channels": {
"feishu": {
"groupPolicy": "open"
// 默认 requireMention: true
}
}
}
```text
#### 允许所有群组,无需 @提及
需要为特定群组配置:
```json
{
"channels": {
"feishu": {
"groups": {
"oc_xxx": { "requireMention": false }
}
}
}
}
```text
#### 仅允许特定用户在群组中使用
```json
{
"channels": {
"feishu": {
"groupPolicy": "allowlist",
"groupAllowFrom": ["ou_xxx", "ou_yyy"]
}
}
}
```text
### 9.1.8 获取群组/用户 ID
#### 获取群组 ID(chat_id)
群组 ID 格式为 `oc_xxx`,可以通过以下方式获取:
**方法一**(推荐):
1. 启动网关并在群组中 @机器人发消息
2. 运行 `openclaw logs --follow` 查看日志中的 `chat_id`
**方法二**:使用飞书 API 调试工具获取机器人所在群组列表。
#### 获取用户 ID(open_id)
用户 ID 格式为 `ou_xxx`,可以通过以下方式获取:
**方法一**(推荐):
1. 启动网关并给机器人发消息
2. 运行 `openclaw logs --follow` 查看日志中的 `open_id`
**方法二**:查看配对请求列表,其中包含用户的 Open ID:
```bash
openclaw pairing list feishu
```text
### 9.1.9 高级配置
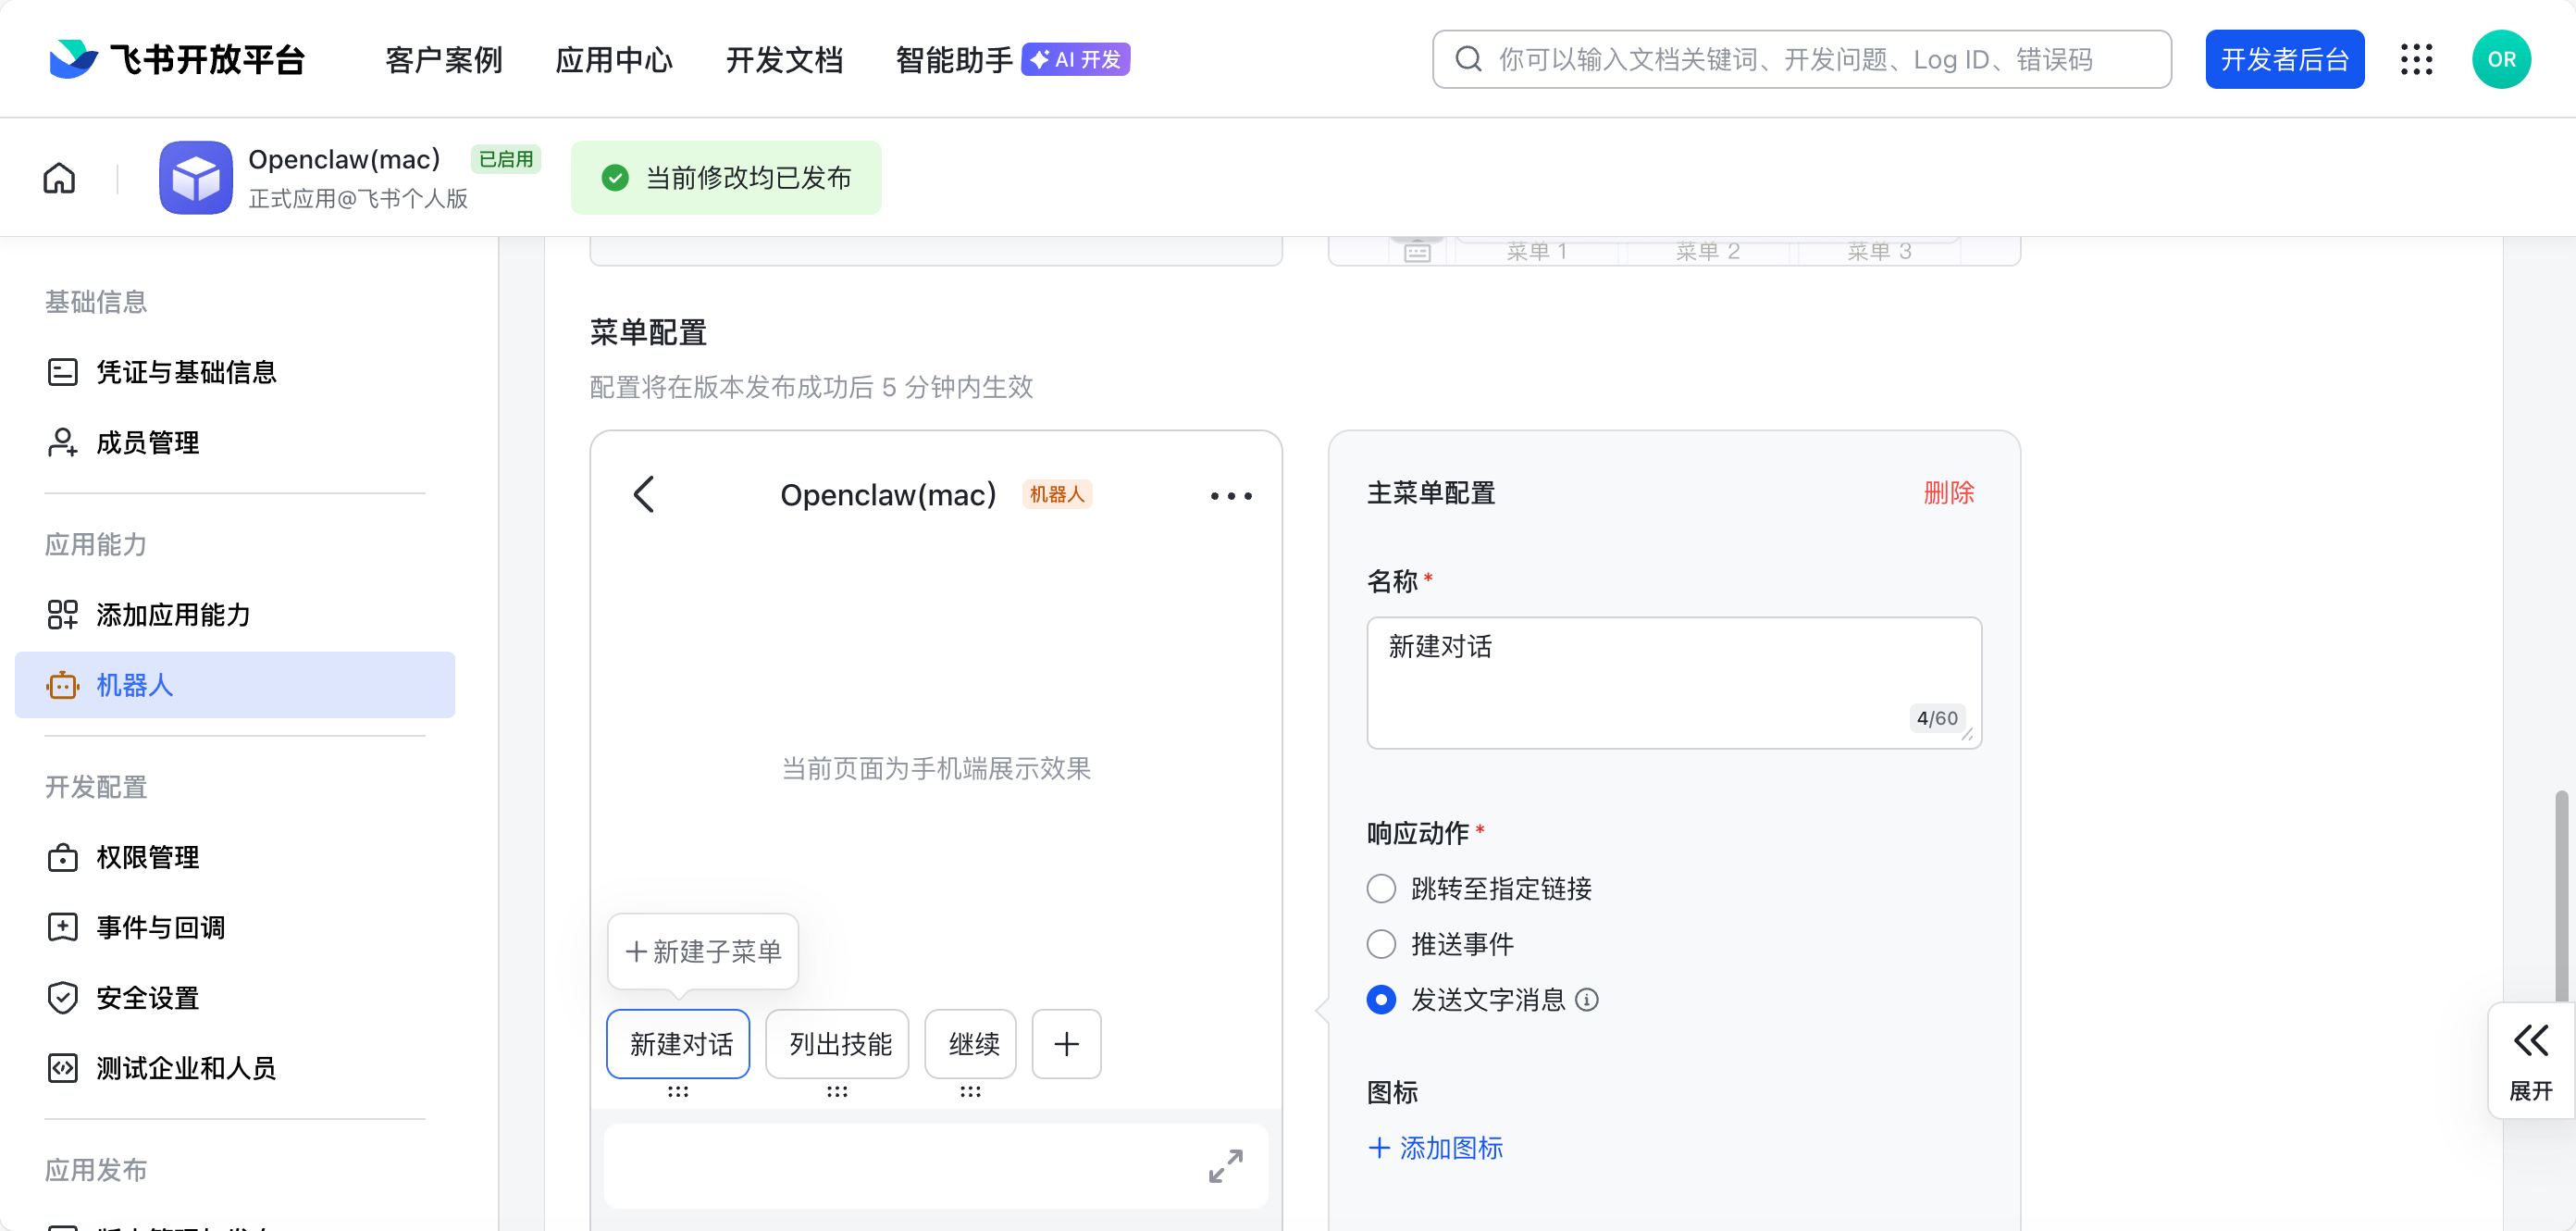
### 自定义菜单
添加常用命令在菜单上
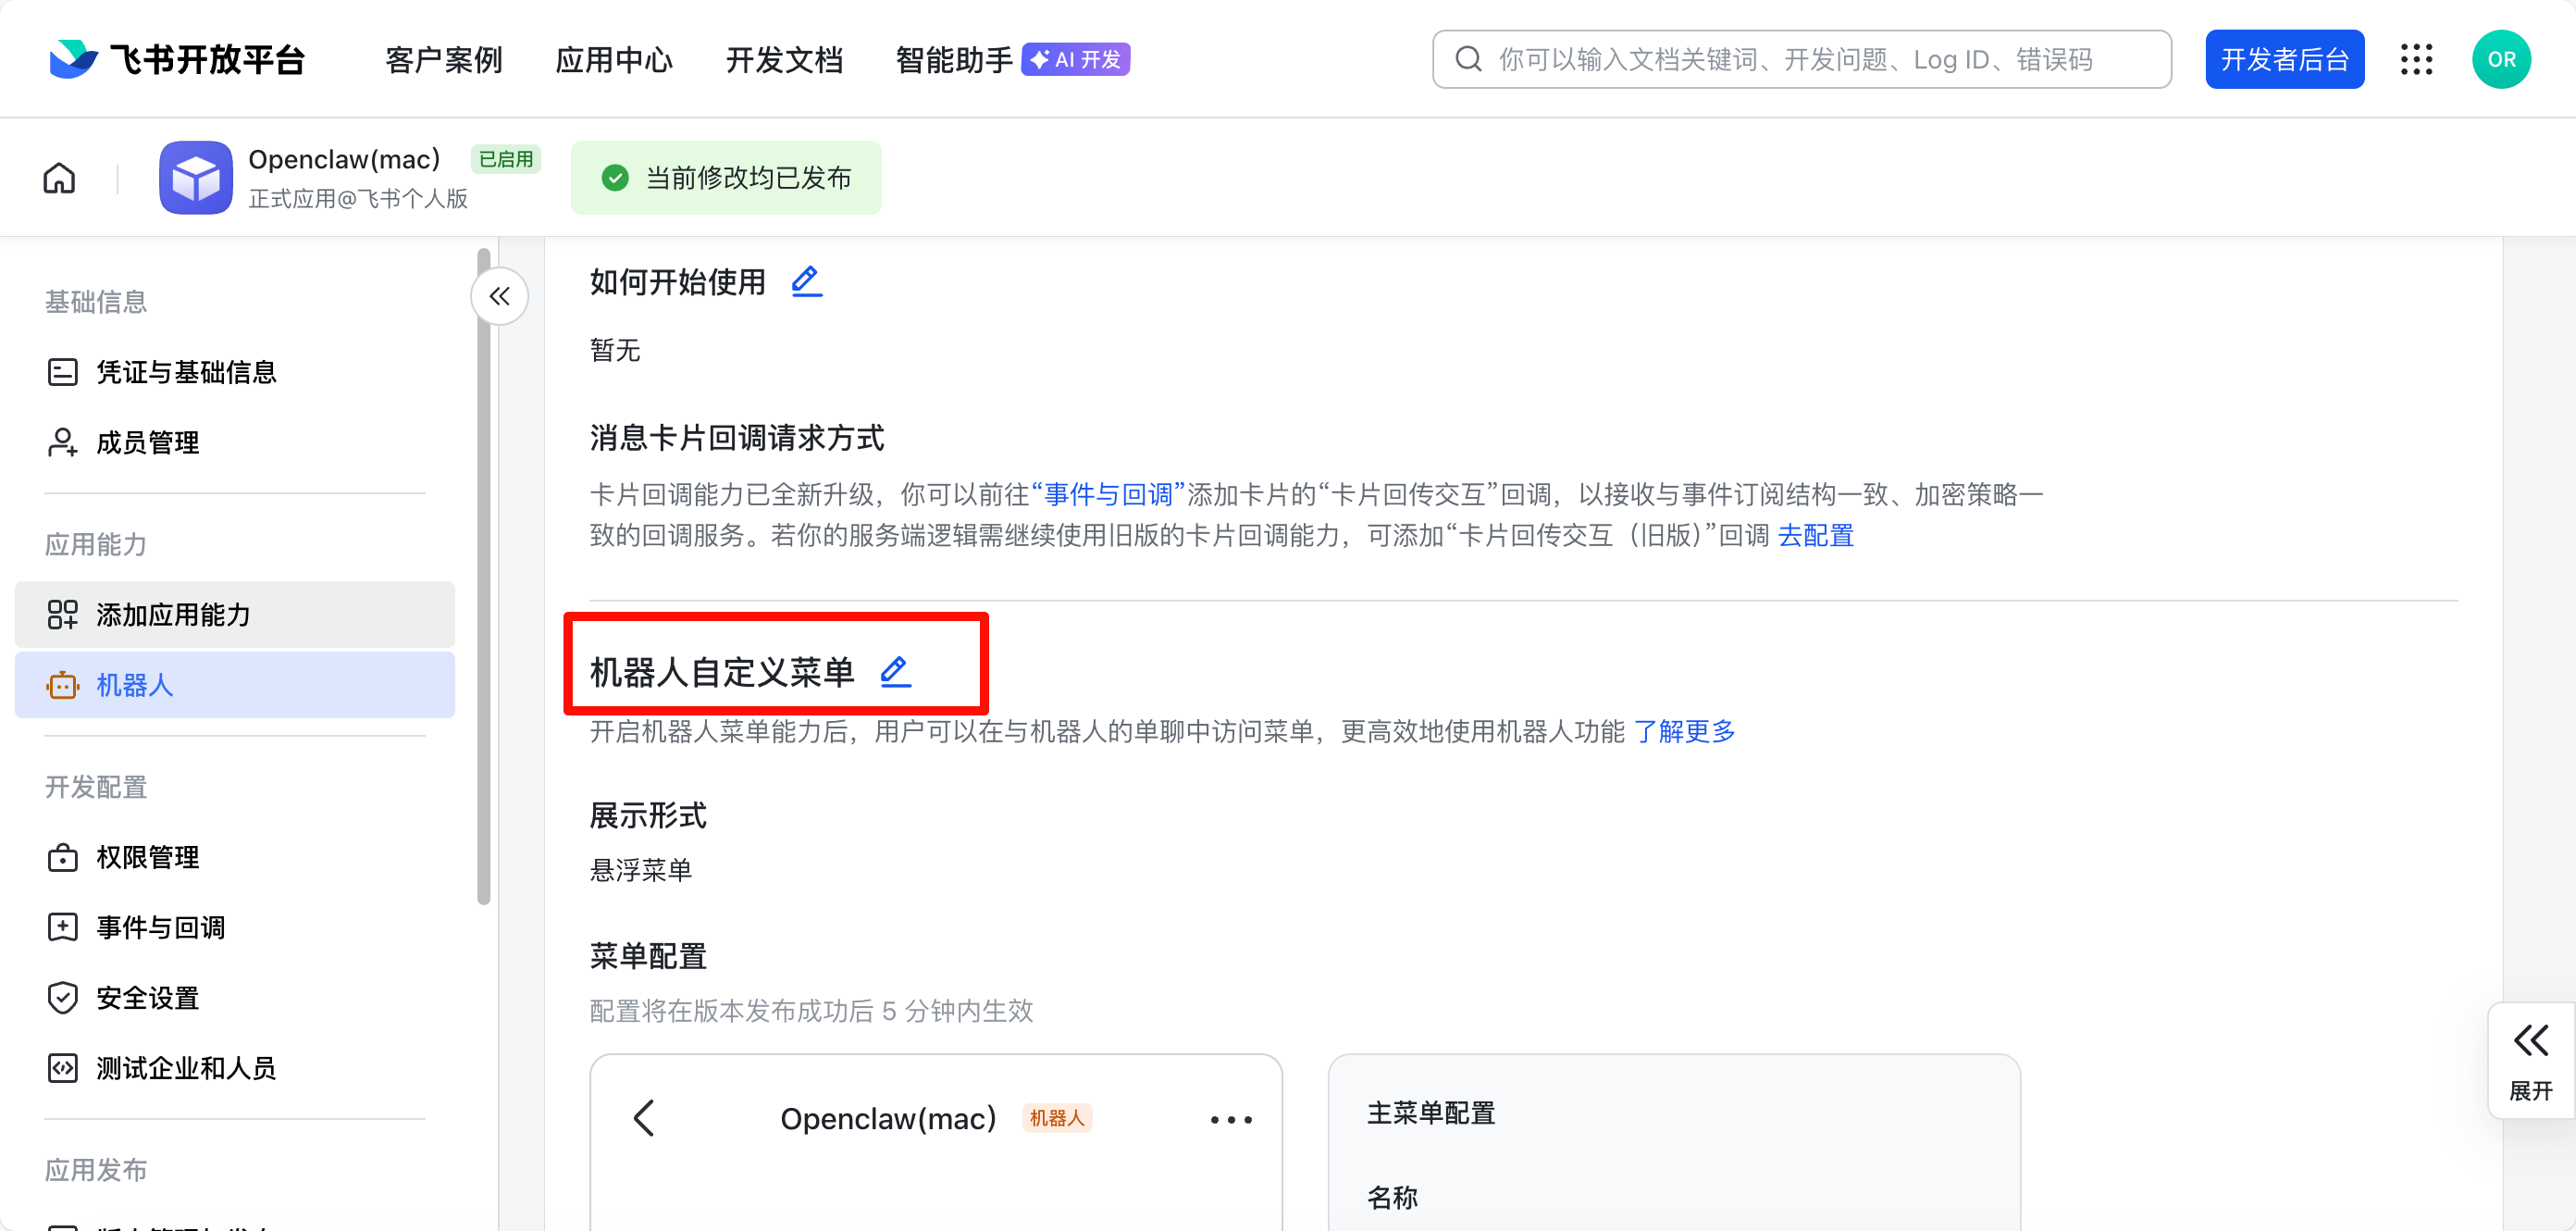
这里我新建了三个常用命令:新建对话,列出技能,继续。
#### 多账号配置
OpenClaw 支持同时管理多个飞书机器人,这在以下场景非常有用:
- 不同团队使用不同的机器人
- 测试环境和生产环境分离
- 不同功能的专用机器人
- 主备机器人配置
**基础配置示例(2个机器人):**
```json
{
"channels": {
"feishu": {
"enabled": true,
"dmPolicy": "pairing",
"accounts": {
"bot1": {
"appId": "cli_xxxxxxxxxxxxxxxx",
"appSecret": "your-app-secret-1",
"botName": "OpenClaw助手1",
"enabled": true
},
"bot2": {
"appId": "cli_yyyyyyyyyyyyyyyy",
"appSecret": "your-app-secret-2",
"botName": "OpenClaw助手2",
"enabled": true
}
},
"domain": "feishu",
"groupPolicy": "open",
"connectionMode": "websocket",
"requireMention": true,
"renderMode": "auto",
"streaming": true,
"blockStreaming": true,
"replyToMode": "all"
}
},
"gateway": {
"port": 18789,
"mode": "local",
"bind": "lan",
"auth": {
"mode": "token",
"token": "your-secure-token-here"
}
},
"agents": {
"defaults": {
"model": {
"primary": "your-provider/your-model"
},
"workspace": "/path/to/your/workspace",
"compaction": {
"mode": "safeguard"
},
"maxConcurrent": 4,
"subagents": {
"maxConcurrent": 8
}
}
}
}
```text
> 💡 **实战提示**:上面的配置示例来自真实的多机器人部署案例。注意 `appSecret` 和 `token` 在生产环境中应该妥善保管,不要提交到代码仓库。
**多机器人配置示例(4个专业助手):**
```json
{
"channels": {
"feishu": {
"enabled": true,
"dmPolicy": "pairing",
"accounts": {
"main-assistant": {
"appId": "cli_main_xxxxxx",
"appSecret": "your-main-secret",
"botName": "主助理",
"enabled": true
},
"content-creator": {
"appId": "cli_content_xxxxxx",
"appSecret": "your-content-secret",
"botName": "内容创作助手",
"enabled": true
},
"tech-dev": {
"appId": "cli_tech_xxxxxx",
"appSecret": "your-tech-secret",
"botName": "技术开发助手",
"enabled": true
},
"ai-news": {
"appId": "cli_news_xxxxxx",
"appSecret": "your-news-secret",
"botName": "AI资讯助手",
"enabled": true
}
},
"domain": "feishu",
"groupPolicy": "open",
"connectionMode": "websocket",
"requireMention": true,
"streaming": true,
"blockStreaming": true,
"replyToMode": "all"
}
},
"agents": {
"defaults": {
"model": {
"primary": "anthropic/claude-sonnet-4"
},
"workspace": "/path/to/workspace",
"compaction": {
"mode": "safeguard"
},
"maxConcurrent": 4,
"subagents": {
"maxConcurrent": 8
}
}
}
}
```text
> ⚠️ **重要提示**:在多账号配置中,不需要使用 `bindings` 来绑定不同的 agent。所有机器人会自动共享 `agents.defaults` 配置。如果需要不同的模型,可以在对话中使用 `/model` 命令切换。
**配置说明:**
| 参数 | 说明 | 必填 |
|------|------|------|
| `accounts.<id>` | 账号唯一标识符(自定义) | ✅ |
| `appId` | 飞书应用的 App ID | ✅ |
| `appSecret` | 飞书应用的 App Secret | ✅ |
| `botName` | 机器人显示名称 | ❌ |
| `enabled` | 是否启用该账号 | ❌ (默认 true) |
**多机器人使用场景:**
1. **一人公司/独立开发者**
- 主助理:任务分发、日程管理
- 内容创作助手:文章、视频脚本
- 技术开发助手:代码开发、调试
- AI资讯助手:行业动态追踪
2. **团队协作**
- 技术团队助手:代码审查、技术讨论
- 产品团队助手:需求分析、用户反馈
- 运营团队助手:数据分析、内容运营
- 测试助手:测试环境专用
3. **环境分离**
- 生产环境助手:正式业务使用
- 测试环境助手:功能测试
- 开发环境助手:开发调试
重要
在 **事件订阅** 页面:
**步骤1:选择长连接模式**
1. 选择 **使用长连接接收事件**(WebSocket 模式)
**步骤2:添加事件**
2. 添加事件:`im.message.receive_v1`(接收消息)
**步骤3:配置必需权限**
3. 在 **权限管理** 页面,确保已添加:
- ✅ `im:message`(获取与发送单聊、群组消息)
- ✅ `im:message:send_as_bot`(以应用身份发消息)
- ✅ `contact:contact.base:readonly`(获取通讯录基本信息)⭐ 必需
> 💡 缺少 `contact:contact.base:readonly` 权限会导致机器人无法识别用户,无法正常响应消息。
2. 添加事件:`im.message.receive_v1`(接收消息)
**实战场景1:团队分离**
为不同团队创建专用机器人:
```json
{
"channels": {
"feishu": {
"accounts": {
"tech-team": {
"appId": "cli_tech_xxx",
"appSecret": "tech_secret",
"botName": "技术团队助手",
"enabled": true
},
"sales-team": {
"appId": "cli_sales_xxx",
"appSecret": "sales_secret",
"botName": "销售团队助手",
"enabled": true
},
"hr-team": {
"appId": "cli_hr_xxx",
"appSecret": "hr_secret",
"botName": "HR助手",
"enabled": true
}
}
}
}
}
```text
**实战场景2:环境分离**
测试环境和生产环境使用不同的机器人:
```json
{
"channels": {
"feishu": {
"accounts": {
"production": {
"appId": "cli_prod_xxx",
"appSecret": "prod_secret",
"botName": "OpenClaw生产环境",
"enabled": true,
"dmPolicy": "pairing"
},
"staging": {
"appId": "cli_staging_xxx",
"appSecret": "staging_secret",
"botName": "OpenClaw测试环境",
"enabled": true,
"dmPolicy": "open"
},
"development": {
"appId": "cli_dev_xxx",
"appSecret": "dev_secret",
"botName": "OpenClaw开发环境",
"enabled": false
}
}
}
}
}
```text
**实战场景3:功能分离**
不同功能使用专用机器人:
```json
{
"channels": {
"feishu": {
"accounts": {
"general": {
"appId": "cli_general_xxx",
"appSecret": "general_secret",
"botName": "通用助手",
"enabled": true
},
"code-review": {
"appId": "cli_code_xxx",
"appSecret": "code_secret",
"botName": "代码审查助手",
"enabled": true
},
"document": {
"appId": "cli_doc_xxx",
"appSecret": "doc_secret",
"botName": "文档助手",
"enabled": true
}
}
}
}
}
```text
**配合多 Agent 使用**
将不同的飞书机器人绑定到不同的 Agent,实现更精细的功能分离:
```json
{
"agents": {
"list": [
{
"id": "general-agent",
"workspace": "/home/user/general",
"agentDir": "/home/user/.openclaw/agents/general/agent"
},
{
"id": "code-agent",
"workspace": "/home/user/code-review",
"agentDir": "/home/user/.openclaw/agents/code/agent"
},
{
"id": "doc-agent",
"workspace": "/home/user/document",
"agentDir": "/home/user/.openclaw/agents/doc/agent"
}
]
},
"channels": {
"feishu": {
"accounts": {
"general": {
"appId": "cli_general_xxx",
"appSecret": "general_secret",
"botName": "通用助手"
},
"code-review": {
"appId": "cli_code_xxx",
"appSecret": "code_secret",
"botName": "代码审查助手"
},
"document": {
"appId": "cli_doc_xxx",
"appSecret": "doc_secret",
"botName": "文档助手"
}
}
}
},
"bindings": [
{
"agentId": "general-agent",
"match": {
"channel": "feishu",
"account": "general"
}
},
{
"agentId": "code-agent",
"match": {
"channel": "feishu",
"account": "code-review"
}
},
{
"agentId": "doc-agent",
"match": {
"channel": "feishu",
"account": "document"
}
}
]
}
```text
**管理多个机器人**
```bash
# 查看所有飞书账号状态
openclaw channels list feishu
# 启用特定账号
openclaw channels enable feishu backup
# 禁用特定账号
openclaw channels disable feishu test
# 重启特定账号
openclaw channels restart feishu main
# 查看特定账号的日志
openclaw logs --channel feishu --account main --follow
```text
**配置文件位置**
```bash
# 主配置文件
~/.openclaw/openclaw.json
# 或者使用独立的渠道配置文件
~/.openclaw/channels/feishu.json
```text
**独立配置文件示例:**
```bash
# 创建独立配置文件
mkdir -p ~/.openclaw/channels
nano ~/.openclaw/channels/feishu.json
```text
```json
{
"enabled": true,
"accounts": {
"main": {
"appId": "cli_xxx",
"appSecret": "xxx",
"botName": "主机器人"
},
"backup": {
"appId": "cli_yyy",
"appSecret": "yyy",
"botName": "备用机器人"
}
}
}注意事项:
App ID 和 App Secret 必须唯一
- 每个机器人必须使用不同的飞书应用
- 不能多个账号共用同一个 App ID
账号标识符命名规范
- 使用小写字母和连字符
- 避免使用特殊字符
- 建议使用有意义的名称(如
tech-team、production)
启用/禁用控制
enabled: true- 账号启用,机器人会接收和处理消息enabled: false- 账号禁用,机器人不会接收消息- 可以随时通过修改配置文件或命令行切换
网关重启
- 修改配置后需要重启网关:
openclaw gateway restart - 或者重新加载配置:
openclaw channels reload
- 修改配置后需要重启网关:
日志查看
- 多账号时,日志会标注账号标识符
- 使用
--account参数过滤特定账号的日志
故障排查:
问题1:某个机器人收不到消息
bash
# 检查账号是否启用
openclaw channels status feishu

# 查看该账号的日志
openclaw logs --channel feishu --account main --follow

# 检查配置是否正确
openclaw config get channels.feishu.accounts.main
```text
**问题2:多个机器人冲突**

确保每个机器人使用不同的飞书应用:
- 不同的 App ID
- 不同的 App Secret
- 在飞书开放平台创建多个应用

**问题3:切换账号不生效**

```bash
# 重启网关
openclaw gateway restart

# 或者重新加载配置
openclaw channels reload feishu
```text
**问题4:配置验证失败 - bindings 错误**
Error: bindings.0.match: Unrecognized key: "account"
text
**原因**:在多账号配置中,不需要使用 `bindings` 来绑定 agent。

**解决方案**:
1. 删除配置文件中的 `bindings` 部分
2. 所有机器人会自动使用 `agents.defaults` 配置
3. 如果需要不同模型,在对话中使用 `/model` 命令切换

**正确的配置结构**:
```json
{
  "channels": {
    "feishu": {
      "accounts": {
        "bot1": { ... },
        "bot2": { ... }
      }
    }
  },
  "agents": {
    "defaults": {
      "model": { "primary": "your-model" },
      "workspace": "/path/to/workspace"
    }
  }
  // ❌ 不需要 bindings
}
```text
**问题5:配置后运行 openclaw doctor 报错**

```bash
# 运行诊断
openclaw doctor

# 如果提示配置问题,运行自动修复
openclaw doctor --fix

# 验证配置
openclaw doctor
# 应该看到:✅ Config valid
```text
**最佳实践:**

1. **使用有意义的账号名称**
   ```json
   "accounts": {
     "prod-main": { ... },      // 生产环境主机器人
     "prod-backup": { ... },    // 生产环境备份
     "test": { ... }            // 测试环境
   }
为不同环境使用不同的策略
json"production": { "dmPolicy": "pairing", // 生产环境需要配对 "groupPolicy": "allowlist" // 群组白名单 }, "development": { "dmPolicy": "open", // 开发环境开放访问 "groupPolicy": "open" // 群组开放 }定期备份配置
bash# 备份配置文件 cp ~/.openclaw/openclaw.json ~/.openclaw/openclaw.json.backup # 或使用 OpenClaw 备份命令 openclaw backup create使用环境变量管理敏感信息
bash# 在 ~/.bashrc 或 ~/.zshrc 中设置 export FEISHU_MAIN_APP_ID="cli_xxx" export FEISHU_MAIN_APP_SECRET="xxx" export FEISHU_BACKUP_APP_ID="cli_yyy" export FEISHU_BACKUP_APP_SECRET="yyy"然后在配置文件中引用:
json{ "channels": { "feishu": { "accounts": { "main": { "appId": "${FEISHU_MAIN_APP_ID}", "appSecret": "${FEISHU_MAIN_APP_SECRET}" } } } } }
流式输出
飞书支持通过交互式卡片实现流式输出,机器人会实时更新卡片内容显示生成进度。
json
{
  "channels": {
    "feishu": {
      "streaming": true,      // 启用流式卡片输出(默认 true)
      "blockStreaming": true  // 启用块级流式(默认 true)
    }
  }
}
```text
如需禁用流式输出(等待完整回复后一次性发送),可设置 `streaming: false`。

#### 消息引用

在群聊中,机器人的回复可以引用用户发送的原始消息,让对话上下文更加清晰。

```json
{
  "channels": {
    "feishu": {
      "replyToMode": "all",  // 账户级别配置(默认 "all")
      "groups": {
        "oc_xxx": {
          "replyToMode": "first"  // 特定群组可以覆盖
        }
      }
    }
  }
}
```text
`replyToMode` 值说明:
- `"off"` = 不引用原消息(私聊默认值)
- `"first"` = 仅在第一条回复时引用原消息
- `"all"` = 所有回复都引用原消息(群聊默认值)

#### 多 Agent 路由

通过 `bindings` 配置,您可以用一个飞书机器人对接多个不同功能或性格的 Agent:

```json
{
  "agents": {
    "list": [
      { "id": "main" },
      {
        "id": "clawd-fan",
        "workspace": "/home/user/clawd-fan",
        "agentDir": "/home/user/.openclaw/agents/clawd-fan/agent"
      },
      {
        "id": "clawd-xi",
        "workspace": "/home/user/clawd-xi",
        "agentDir": "/home/user/.openclaw/agents/clawd-xi/agent"
      }
    ]
  },
  "bindings": [
    {
      "agentId": "main",
      "match": {
        "channel": "feishu",
        "peer": { "kind": "dm", "id": "ou_28b31a88..." }
      }
    },
    {
      "agentId": "clawd-fan",
      "match": {
        "channel": "feishu",
        "peer": { "kind": "dm", "id": "ou_0fe6b1c9..." }
      }
    },
    {
      "agentId": "clawd-xi",
      "match": {
        "channel": "feishu",
        "peer": { "kind": "group", "id": "oc_xxx..." }
      }
    }
  ]
}
```text
### 9.1.10 常用命令

#### 机器人命令

| 命令 | 说明 |
|------|------|
| `/status` | 查看机器人状态 |
| `/reset` | 重置对话会话 |
| `/model` | 查看/切换模型 |

#### 网关管理命令

| 命令 | 说明 |
|------|------|
| `openclaw gateway status` | 查看网关运行状态 |
| `openclaw gateway install` | 安装/启动网关服务 |
| `openclaw gateway stop` | 停止网关服务 |
| `openclaw gateway restart` | 重启网关服务 |
| `openclaw logs --follow` | 实时查看日志输出 |

### 9.1.11 故障排除

#### 机器人在群组中不响应

1. 检查机器人是否已添加到群组
2. 检查是否 @了机器人(默认需要 @提及)
3. 检查 `groupPolicy` 是否为 `"disabled"`
4. 查看日志:`openclaw logs --follow`

#### 机器人收不到消息

**可能原因及解决方案**:

1. **检查应用是否已发布并审批通过**
   ```bash
   # 在飞书开放平台查看应用状态
   # 确保应用已通过审核并发布
检查事件订阅是否配置正确
- ✅ 已选择"使用长连接接收事件"(WebSocket模式)
- ✅ 已添加事件:
im.message.receive_v1 - ✅ 长连接状态显示"已连接"
检查权限配置是否完整⭐ 重要
缺少权限会导致机器人无法正常工作,请确保已添加以下权限:
权限标识 权限名称 检查方法 im:message获取与发送单聊、群组消息 在权限管理页面查看 im:message:send_as_bot以应用身份发消息 在权限管理页面查看 contact:contact.base:readonly获取通讯录基本信息 ⭐ 必需,否则无法识别用户 如何检查权限:
text1. 登录飞书开放平台 2. 进入你的应用 3. 点击"权限管理" 4. 确认上述三个权限都已添加 5. 如果缺少,点击"添加权限"补充常见错误:
- ❌ 只添加了
im:message,忘记添加contact:contact.base:readonly - ❌ 权限添加后未重新发布应用
- ❌ 权限范围设置不正确
- ❌ 只添加了
检查网关状态
bash# 查看网关是否正常运行 openclaw gateway status # 查看实时日志 openclaw logs --follow检查渠道配置
bash# 查看飞书渠道配置 openclaw channels list # 确认 appId 和 appSecret 正确 openclaw config get channels.feishu检查应用是否已发布并审批通过
检查事件订阅是否配置正确(
im.message.receive_v1)检查是否选择了 长连接 模式
检查应用权限是否完整
检查网关是否正在运行:
openclaw gateway status查看实时日志:
openclaw logs --follow
配置文件 JSON 语法错误
错误示例:
JSON5 parse error at line 443: Python True/False vs JSON true/false
```text
**解决方案:**
```bash
# 检查 JSON 语法
cat ~/.openclaw/openclaw.json | python -m json.tool

# 常见错误:
# ❌ "enabled": True   (Python 语法)
# ✅ "enabled": true   (JSON 语法)

# ❌ 多余的逗号
# ✅ 最后一项不要逗号
```text
#### 网关启动失败

**错误1:Gateway start blocked**
```bash
# 错误信息
Gateway start blocked: set gateway.mode=local (current: unset)

# 解决方案:在配置文件中添加
{
  "gateway": {
    "mode": "local"
  }
}
```text
**错误2:Gateway auth token 未配置**
```bash
# 错误信息
Gateway auth is set to token, but no token is configured

# 解决方案1:配置文件
{
  "gateway": {
    "auth": {
      "mode": "token",
      "token": "your-secure-token"
    }
  }
}

# 解决方案2:环境变量
export OPENCLAW_GATEWAY_TOKEN="your-secure-token"
```text
**错误3:插件未找到**
```bash
# 错误信息
Config validation failed: plugins.entries.qqbot: plugin not found: qqbot

# 解决方案:移除未安装的插件配置
{
  "plugins": {
    "entries": {
      "feishu": {
        "enabled": true
      }
      // 移除 qqbot, ddingtalk, wecom 等未安装的插件
    }
  }
}
```text
**错误4:工作空间路径错误**
```bash
# 错误信息
run error: Error: ENOENT: no such file or directory, mkdir '/root'

# 解决方案:修正 workspace 路径(macOS 示例)
{
  "agents": {
    "defaults": {
      "workspace": "/Users/yourusername/clawd"  // 使用正确的 macOS 路径
    }
  }
}
```text
#### App Secret 泄露怎么办

1. 在飞书开放平台重置 App Secret
2. 更新配置文件中的 App Secret
3. 重启网关:`openclaw gateway restart`

#### 发送消息失败

1. 检查应用是否有 `im:message:send_as_bot` 权限
2. 检查应用是否已发布
3. 查看日志获取详细错误信息:`openclaw logs --follow`

#### 网关端口被占用

```bash
# 错误信息
Port 18789 is already in use

# 解决方案1:停止现有网关
openclaw gateway stop

# 解决方案2:使用不同端口
{
  "gateway": {
    "port": 18790
  }
}
```text
#### 配置修改不生效

```bash
# 修改配置后必须重启网关
openclaw gateway restart

# 或重新加载配置
openclaw channels reload feishu

# 检查配置是否正确加载
openclaw config get channels.feishu
```text
### 9.1.12 配置参考

| 配置项 | 说明 | 默认值 |
|--------|------|--------|
| `channels.feishu.enabled` | 启用/禁用渠道 | `true` |
| `channels.feishu.domain` | API 域名(`feishu` 或 `lark`) | `feishu` |
| `channels.feishu.accounts.<id>.appId` | 应用 App ID | - |
| `channels.feishu.accounts.<id>.appSecret` | 应用 App Secret | - |
| `channels.feishu.dmPolicy` | 私聊策略 | `pairing` |
| `channels.feishu.allowFrom` | 私聊白名单(open_id 列表) | - |
| `channels.feishu.groupPolicy` | 群组策略 | `open` |
| `channels.feishu.groupAllowFrom` | 群组白名单 | - |
| `channels.feishu.groups.<chat_id>.requireMention` | 是否需要 @提及 | `true` |
| `channels.feishu.textChunkLimit` | 消息分块大小 | `2000` |
| `channels.feishu.mediaMaxMb` | 媒体大小限制 | `30` |
| `channels.feishu.streaming` | 启用流式卡片输出 | `true` |
| `channels.feishu.blockStreaming` | 启用块级流式 | `true` |

#### dmPolicy 策略说明

| 值 | 行为 |
|----|------|
| `"pairing"` | **默认**。未知用户收到配对码,管理员批准后才能对话 |
| `"allowlist"` | 仅 `allowFrom` 列表中的用户可对话,其他静默忽略 |
| `"open"` | 允许所有人对话(需在 allowFrom 中加 `"*"`) |
| `"disabled"` | 完全禁止私聊 |

### 9.1.13 支持的消息类型

#### 接收
- ✅ 文本消息
- ✅ 图片
- ✅ 文件
- ✅ 音频
- ✅ 视频
- ✅ 表情包

#### 发送
- ✅ 文本消息
- ✅ 图片
- ✅ 文件
- ✅ 音频
- ⚠️ 富文本(部分支持)

### 9.1.14 与飞书生态集成

**集成飞书文档**
功能:
- 创建文档
- 编辑文档
- 分享文档
- 权限管理
示例: 你:把这段内容保存到飞书文档 OpenClaw:已保存到飞书文档 ✅ 链接:https://...
text
**集成飞书多维表格**功能:
- 创建表格
- 添加数据
- 查询数据
- 数据分析
示例: 你:把发票信息添加到多维表格 OpenClaw:已添加3条记录 ✅
text
**集成飞书日历**功能:
- 创建日程
- 修改日程
- 删除日程
- 日程提醒
示例: 你:明天下午3点开会 OpenClaw:已添加到飞书日历 ✅
text
---

### 9.1.15 实战案例:配置双机器人

> 💡 **真实案例**:本节展示一个实际的双机器人配置案例,适用于需要分离不同功能或团队的场景。

#### 场景说明

某团队需要两个飞书机器人:
- **机器人1**:用于日常办公和通用任务
- **机器人2**:用于特定项目或测试环境

#### 完整配置步骤

**1. 在飞书开放平台创建两个应用**

分别创建两个企业自建应用,获取:
- 机器人1:App ID `cli_xxxxxxxxxxxxxxxx`,App Secret
- 机器人2:App ID `cli_yyyyyyyyyyyyyyyy`,App Secret

**2. 配置 OpenClaw**

编辑 `~/.openclaw/openclaw.json`:

```json
{
  "meta": {
    "lastTouchedVersion": "2026.2.6-3",
    "lastTouchedAt": "2026-02-08T09:49:58.322Z"
  },
  "channels": {
    "feishu": {
      "enabled": true,
      "dmPolicy": "pairing",
      "accounts": {
        "bot1": {
          "appId": "cli_xxxxxxxxxxxxxxxx",
          "appSecret": "your-app-secret-1",
          "botName": "OpenClaw助手1",
          "enabled": true
        },
        "bot2": {
          "appId": "cli_yyyyyyyyyyyyyyyy",
          "appSecret": "your-app-secret-2",
          "botName": "OpenClaw助手2",
          "enabled": true
        }
      },
      "domain": "feishu",
      "groupPolicy": "open",
      "connectionMode": "websocket",
      "requireMention": true,
      "renderMode": "auto",
      "streaming": true,
      "blockStreaming": true,
      "replyToMode": "all"
    }
  },
  "gateway": {
    "port": 18789,
    "mode": "local",
    "bind": "lan",
    "auth": {
      "mode": "token",
      "token": "your-secure-random-token-here"
    }
  },
  "agents": {
    "defaults": {
      "model": {
        "primary": "your-model-provider/your-model"
      },
      "workspace": "/path/to/your/workspace",
      "compaction": {
        "mode": "safeguard"
      },
      "maxConcurrent": 4
    }
  },
  "plugins": {
    "entries": {
      "feishu": {
        "enabled": true
      }
    }
  }
}
```text
**3. 配置飞书应用权限**

为两个应用分别配置权限(批量导入 JSON,参见 9.1.3 节)。

**4. 配置事件订阅**

为两个应用分别配置:
- 选择 **使用长连接接收事件**
- 添加事件:`im.message.receive_v1`

**5. 启动网关**

```bash
# 启动网关
openclaw gateway install

# 检查状态
openclaw gateway status

# 应该看到:
# ✅ Gateway: running (pid 57344, state active)
# ✅ Gateway target: ws://127.0.0.1:18789
```text
**6. 测试机器人**

在飞书中分别给两个机器人发送消息:
你:hi 机器人:[配对码] 请管理员批准配对
text
**7. 批准配对**

```bash
# 查看配对请求
openclaw pairing list feishu

# 批准机器人1
openclaw pairing approve feishu <配对码1>

# 批准机器人2
openclaw pairing approve feishu <配对码2>
```text
**8. 验证运行**

查看日志确认两个机器人都在正常运行:

```bash
openclaw logs --follow

# 应该看到:
# HEARTBEAT_OK
# hi
# connected | running
# agent main | session main (heartbeat)
```text
#### 常见问题处理

**问题1:配置文件 JSON 语法错误**

```bash
# 错误:JSON5 parse error at line 443
# 原因:使用了 Python 语法(True/False)而非 JSON 语法(true/false)

# 检查语法
cat ~/.openclaw/openclaw.json | python -m json.tool

# 修正:
# ❌ "enabled": True
# ✅ "enabled": true
```text
**问题2:网关启动失败**

```bash
# 错误:Gateway start blocked: set gateway.mode=local
# 解决:确保配置了 gateway.mode

{
  "gateway": {
    "mode": "local"
  }
}
```text
**问题3:工作空间路径错误**

```bash
# 错误:ENOENT: no such file or directory, mkdir '/root'
# 原因:配置文件中使用了 Linux 路径,但实际是 macOS

# 修正(macOS):
{
  "agents": {
    "defaults": {
      "workspace": "/Users/yourusername/clawd"
    }
  }
}
```text
**问题4:插件未找到**

```bash
# 错误:plugin not found: qqbot
# 原因:配置文件中引用了未安装的插件

# 解决:只保留已安装的插件
{
  "plugins": {
    "entries": {
      "feishu": {
        "enabled": true
      }
      // 移除 qqbot, ddingtalk, wecom 等
    }
  }
}
```text
#### 配置检查清单

- [ ] 两个飞书应用已创建
- [ ] App ID 和 App Secret 已获取
- [ ] 配置文件 JSON 语法正确
- [ ] gateway.mode 已设置为 "local"
- [ ] gateway.auth.token 已配置
- [ ] workspace 路径正确(macOS/Linux)
- [ ] 只配置了已安装的插件
- [ ] 两个应用的权限已配置
- [ ] 两个应用的事件订阅已配置(长连接)
- [ ] 两个应用已发布
- [ ] 网关已启动并运行正常
- [ ] 两个机器人都已配对批准
- [ ] 日志显示正常运行

#### 成功标志

配置成功后,你应该看到:

```bash
# 网关状态
$ openclaw gateway status
✅ Gateway: running (pid xxxxx, state active)
✅ Gateway target: ws://127.0.0.1:18789

# 日志输出
$ openclaw logs --follow
HEARTBEAT_OK
hi
connected | running
agent main | session main (heartbeat) | your-model-provider/your-model
tokens 25k/200k (13%)
```text
两个机器人都可以正常接收和回复消息!🎉

---

## 9.4 QQ Bot配置

### 9.4.1 QQ机器人介绍

**QQ的优势**:

1. **用户基础**
   - 用户量大
   - 覆盖面广
   - 使用习惯

2. **社交属性**
   - 群聊活跃
   - 互动性强
   - 娱乐功能

3. **开放平台**
   - QQ频道
   - QQ群机器人
   - API支持

4. **免费使用**
   - 基础功能免费
   - 易于上手

### 9.4.2 创建QQ机器人

> ⚠️ **重要提示**:QQ开放平台需要先注册账号,不是直接用QQ登录!请务必先完成注册。

**步骤1:注册QQ开放平台账号**

1. **访问QQ开放平台**:
2. **注册新账号**:
- ⚠️ 不是QQ登录,需要单独注册
- 点击"注册"按钮
- 填写注册信息
- 完成邮箱/手机验证

3. **登录平台**:
- 使用刚注册的账号登录
- 不要使用QQ扫码登录

**步骤2:创建机器人**

1. **进入机器人管理**:
- 登录后点击"机器人"
- 点击"创建机器人"

2. **填写机器人信息**:
- 机器人名称:自定义(如:我的AI助手)
- 机器人头像:上传图片
- 机器人简介:简单描述功能
- 点击"创建"

3. **等待审核**:
- 提交后等待审核(通常几分钟)
- 审核通过后即可使用

**步骤3:配置机器人**

1. **获取机器人凭证**:
- 进入机器人详情页
- 点击"开发管理"
- 记录以下信息:
  - **机器人ID**(BotAppID)
  - **机器人密钥**(Bot Secret)

2. **配置IP白名单**:
- 在"开发管理"页面
- 找到"IP白名单"设置
- 添加你的服务器公网IP地址
- 点击"保存"

3. **添加测试用户**:
- 在"管理" → "成员管理"
- 点击"添加成员"
- 输入你的QQ号
- 将自己添加为测试用户

4. **扫码添加机器人好友**:
- 在机器人详情页找到二维码
- 用手机QQ扫码
- 添加机器人为好友

**步骤4:配置 OpenClaw连接**

1. **获取服务器IP地址**:
- 如果使用腾讯云,在控制台查看公网IP
- 记录这个IP地址

2. **在腾讯云Lighthouse配置**(如果使用腾讯云):
- 登录腾讯云:https://console.cloud.tencent.com/lighthouse
- 进入实例详情
- 点击"应用管理"标签
- 找到"QQ机器人配置"区域
- 填入:
  - 机器人ID(BotAppID)
  - 机器人密钥(Bot Secret)
- 点击"应用配置"

3. **本地配置方式**:
```bash
# 运行配置向导
openclaw onboard

# 选择 QuickStart
# 选择模型(如 Kimi 2.5)
# 输入模型 API Key
# 选择通道:QQ
# 输入机器人ID和密钥
9.4.3 配置 OpenClaw
💡 前置要求:请先完成 OpenClaw 的基础安装和配置,详见 第2章:环境搭建。
方式一:使用腾讯云Lighthouse(推荐)
如果你使用腾讯云Lighthouse部署OpenClaw,配置非常简单:
进入应用管理:
- 登录腾讯云控制台
- 进入轻量应用服务器
- 点击实例 → "应用管理"
配置QQ机器人:
- 找到"QQ机器人配置"区域
- 填入机器人ID和密钥
- 点击"应用配置"
- 等待配置生效
验证连接:
- 打开手机QQ
- 给机器人发送消息:"你好"
- 如果收到回复,说明配置成功
方式二:本地配置
如果你是本地部署或其他云服务器,使用命令行配置:
bash
# 1. 运行配置向导
openclaw onboard

# 2. 选择配置选项
# - 选择 Yes 接受风险
# - 选择 QuickStart(快速开始)

# 3. 配置模型
# - 选择模型供应商(如 Moonshot AI)
# - 输入 API Key
# - 选择默认模型(如 kimi-code/kimi-for-codi)

# 4. 配置通道
# - 选择通道:QQ
# - 输入机器人ID(BotAppID)
# - 输入机器人密钥(Bot Secret)

# 5. 配置Skills和Hooks
# - Skills:选择 Yes,可以先不安装
# - Hooks:选择 session-memory

# 6. 重启服务
# - 选择 Yes 重启 gateway 服务

# 7. 测试连接
# - 选择打开 TUI(终端界面)
# - 或直接在QQ中测试
```text
**方式三:手动编辑配置文件**

```bash
# 编辑配置文件
nano ~/.openclaw/config.json

# 添加QQ配置
{
  "channels": {
    "qq": {
      "enabled": true,
      "botAppId": "你的机器人ID",
      "botSecret": "你的机器人密钥",
      "profiles": ["default"]
    }
  }
}

# 重启服务
systemctl --user restart openclaw-gateway.service
```text
**启动Gateway服务**

```bash
# 方式1:前台运行(用于测试)
openclaw gateway --port 18789 --verbose

# 方式2:后台运行(推荐)
nohup openclaw gateway --port 18789 --verbose > /dev/null 2>&1 &

# 方式3:使用systemd(最稳定)
systemctl --user enable openclaw-gateway.service
systemctl --user start openclaw-gateway.service
```text
**验证配置**

```bash
# 查看服务状态
systemctl --user status openclaw-gateway.service

# 查看日志
journalctl --user -u openclaw-gateway.service -f

# 测试连接
# 在QQ中给机器人发送消息:"你好"
```text
### 9.4.4 实战案例

**案例1:个人助手**
功能:
- 日常对话
- 信息查询
- 任务提醒
- 娱乐互动
使用示例: 你:今天天气怎么样? OpenClaw:今天晴天,15-25°C
你:提醒我明天交作业 OpenClaw:已设置提醒 ✅
text
**案例2:群管理**功能:
- 群公告
- 成员管理
- 消息统计
- 自动回复
使用示例: 管理员:@OpenClaw 发布公告 OpenClaw:公告已发布 ✅
成员:@OpenClaw 查询群规 OpenClaw:群规如下...
text
**案例3:娱乐互动**功能:
- 聊天对话
- 讲笑话
- 猜谜语
- 玩游戏
使用示例: 你:讲个笑话 OpenClaw:好的,听我说...
你:猜谜语 OpenClaw:什么东西...
text
### 9.4.5 限制和注意事项

**功能限制**:
⚠️ QQ机器人有以下限制:
- 消息频率限制
- 功能权限限制
- 审核要求严格
- 部分API需要申请
- 目前不支持主动发送消息(2026.2.6测试)
text
**注意事项**:✅ 遵守平台规则 ✅ 不发送违规内容 ✅ 合理使用API ✅ 及时响应用户 ✅ 定期检查服务状态
text
**常见问题**:

1. **机器人不回复消息**:
   - 检查IP白名单是否正确
   - 检查机器人ID和密钥是否正确
   - 查看Gateway服务是否运行
   - 检查服务器日志

2. **配置后无法连接**:
   - 确认已添加为测试用户
   - 确认已添加机器人好友
   - 重启Gateway服务
   - 检查防火墙设置

3. **消息延迟**:
   - 检查网络连接
   - 检查服务器负载
   - 考虑升级服务器配置

---

## 9.5 Discord Bot配置(参考)

> ⚠️ **过时提示**:本节内容编写于2026年1月,当时OpenClaw还叫Clawbot/Moltbot。虽然部分命令已过时,但配置流程仍可作为参考。

### 9.5.1 Discord机器人介绍

**Discord的优势**:

1. **国际化平台**
   - 全球用户基础
   - 多语言支持
   - 社区活跃

2. **开发友好**
   - API完善
   - 文档详细
   - 权限灵活

3. **功能丰富**
   - 支持语音频道
   - 支持富文本
   - 支持自定义表情

**适用场景**:
- ✅ 国际团队协作
- ✅ 游戏社区
- ✅ 开源项目
- ✅ 技术交流

### 9.5.2 创建Discord机器人

**步骤1:访问开发者门户**
https://discord.com/developers/applications
text
**步骤2:创建应用**

1. 点击"New Application"
2. 输入应用名称(如:My OpenClaw Bot)
3. 点击"Create"

**步骤3:创建Bot**

1. 在左侧菜单选择"Bot"
2. 点击"Add Bot"
3. 点击"Reset Token" → "Copy"
4. ⚠️ **保存Token**,后续无法再查看

**步骤4:配置Bot权限**

1. 在Bot页面下滑
2. 开启"Message Content Intent"
3. 点击"Save Changes"

**步骤5:生成邀请链接**

1. 在左侧菜单选择"OAuth2" → "URL Generator"
2. 在"Scopes"中勾选:`bot`
3. 在"Bot Permissions"中勾选:
   - Send Messages
   - Read Message History
4. 复制生成的URL

**步骤6:邀请Bot到服务器**

1. 在浏览器中打开刚才复制的URL
2. 选择你的Discord服务器
3. 点击"授权"
4. 完成验证

### 9.5.3 配置 OpenClaw(旧版命令参考)

> ⚠️ **注意**:以下命令使用的是旧版本的`clawdbot`命令,新版本应使用`openclaw`。

**配置步骤**(需要更新为新命令):

```bash
# 旧版命令(仅供参考)
clawdbot onboard

# 新版命令(推荐)
openclaw onboard

# 配置流程:
# 1. 选择 Yes 接受风险
# 2. 选择 QuickStart
# 3. 配置模型(如 GLM 4.7)
# 4. 选择通道:Discord
# 5. 输入 Bot Token
# 6. 配置 Skills 和 Hooks
```text
**启动服务**:

```bash
# 旧版命令
clawdbot gateway --port 18789 --verbose

# 新版命令
openclaw gateway --port 18789 --verbose

# 后台运行
nohup openclaw gateway --port 18789 --verbose > /dev/null 2>&1 &
```text
**配对连接**:

```bash
# 1. 在Discord中私聊Bot,获取配对码
# 2. 停止Gateway服务(Ctrl+C)
# 3. 运行配对命令(旧版)
clawdbot pairing approve discord <Pairing code>

# 新版命令(需要确认)
openclaw pairing approve discord <Pairing code>

# 4. 重新启动Gateway
openclaw gateway --port 18789 --verbose
```text
### 9.5.4 使用Discord Bot

**私聊模式**:- 在Discord中找到你的Bot
- 点击Bot头像
- 点击"发送消息"
- 直接发送消息即可
text
**群聊模式**:- 在频道中@Bot
- 输入你的问题
- Bot会回复你
示例: @MyBot 今天天气怎么样?
text
### 9.5.5 注意事项

**命令更新**:
- 本节使用的`clawdbot`命令已过时
- 新版本统一使用`openclaw`命令
- 配置流程基本相同,但命令需要更新

**配置参考**:
- Discord的配置流程仍然有效
- Bot创建步骤没有变化
- 主要是OpenClaw 命令需要更新

**推荐做法**:
- 优先使用国内平台(飞书、QQ、企微)
- Discord适合国际团队
- 如需使用Discord,请参考最新官方文档


---

## 9.5 平台对比与选择

### 9.5.1 功能对比

| 功能 | 飞书 | 企业微信 | 钉钉 | QQ |
|------|------|---------|------|-----|
| 企业办公 | ⭐⭐⭐⭐⭐ | ⭐⭐⭐⭐⭐ | ⭐⭐⭐⭐⭐ | ⭐⭐ |
| 即时通讯 | ⭐⭐⭐⭐⭐ | ⭐⭐⭐⭐⭐ | ⭐⭐⭐⭐ | ⭐⭐⭐⭐⭐ |
| 文档协作 | ⭐⭐⭐⭐⭐ | ⭐⭐⭐ | ⭐⭐⭐⭐ | ⭐ |
| 开发友好 | ⭐⭐⭐⭐⭐ | ⭐⭐⭐⭐ | ⭐⭐⭐⭐ | ⭐⭐⭐ |
| 用户基础 | ⭐⭐⭐ | ⭐⭐⭐⭐ | ⭐⭐⭐⭐ | ⭐⭐⭐⭐⭐ |
| 免费额度 | ⭐⭐⭐⭐⭐ | ⭐⭐⭐⭐⭐ | ⭐⭐⭐⭐⭐ | ⭐⭐⭐⭐⭐ |

### 9.5.2 使用场景推荐

**飞书**:
✅ 适合场景:
- 现代化办公
- 文档协作
- 知识管理
- 团队协作
- 技术团队
❌ 不适合:
- 传统企业
- 简单需求
text
**企业微信**:✅ 适合场景:
- 企业内部使用
- 需要与微信互通
- 客户服务
- 营销推广
❌ 不适合:
- 纯个人使用
- 需要复杂文档协作
text
**钉钉**:✅ 适合场景:
- 企业办公
- 考勤管理
- 审批流程
- 项目管理
❌ 不适合:
- 个人娱乐
- 社交互动
text
**QQ**:✅ 适合场景:
- 个人使用
- 社交互动
- 娱乐功能
- 学生群体
❌ 不适合:
- 企业办公
- 正式场合
text
### 9.5.3 多平台组合策略

**策略1:工作+生活分离**
工作:飞书/企业微信/钉钉 生活:QQ
优势:
- 工作生活分离
- 专注度更高
- 管理更方便
text
**策略2:全平台覆盖**同时接入所有平台
优势:
- 覆盖所有用户
- 随时随地使用
- 功能互补
劣势:
- 维护成本高
- 消息分散
text
**策略3:主次搭配(推荐)**主平台:飞书(日常使用) 辅平台:企业微信(客户沟通)
优势:
- 重点突出
- 成本可控
- 易于管理
text
---
## 📝 本章小结
本章学习了OpenClaw的多平台集成功能:
### 核心内容
1. **飞书Bot配置**
- 创建飞书应用
- 配置 OpenClaw
- 实战案例(个人助手、项目管理)
- 与飞书生态集成
- 高级功能(流式输出、多Agent路由)
2. **企业微信Bot配置**
- 注册和创建应用
- 配置 OpenClaw
- 实战案例(个人助手、团队协作、客户服务)
- 手机端使用技巧
3. **钉钉Bot配置**
- 创建钉钉应用
- 配置 OpenClaw
- 实战案例(工作助手、审批流程)
4. **QQ Bot配置**
- 创建QQ机器人
- 配置 OpenClaw
- 实战案例(个人助手、群管理、娱乐互动)
- 限制和注意事项
### 平台选择
- **飞书**:现代化办公、文档协作、技术团队(推荐优先)
- **企业微信**:企业办公、客户服务
- **钉钉**:考勤管理、审批流程
- **QQ**:个人使用、社交互动
### 实战技巧
- ✅ 选择合适的平台
- ✅ 合理配置权限
- ✅ 优化使用体验
- ✅ 多平台组合使用
- ✅ 遵守平台规则
### 下一步
- 学习第10章:API服务封装
- 掌握Banana绘图、Notion同步等
- 构建多功能AI工具箱
---
## 🎯 实战练习
### 练习1:配置飞书Bot
1. 注册飞书开放平台
2. 创建应用
3. 配置 OpenClaw
4. 测试文档集成
### 练习2:配置企业微信Bot
1. 注册企业微信
2. 创建应用
3. 配置 OpenClaw
4. 测试基本功能
### 练习3:多平台对比
1. 分别体验4个平台
2. 对比功能差异
3. 选择适合自己的平台
---
## 💡 常见问题
**Q1:哪个平台最好用?**
A:看使用场景。技术团队推荐飞书(开发友好、功能强大),企业用飞书/钉钉,个人用QQ,客户服务用企业微信。
**Q2:可以同时接入多个平台吗?**
A:可以,OpenClaw支持同时接入多个平台。
**Q3:配置复杂吗?**
A:云端部署很简单,参考官方教程即可。飞书配置最简单,支持WebSocket长连接。
**Q4:免费吗?**
A:平台基础功能都免费,OpenClaw也免费。
**Q5:手机上能用吗?**
A:可以,所有平台都支持手机端。飞书的移动端体验最好。
---
## 📚 参考资源
### 官方教程
**飞书**:
- 快速接入指南:https://cloud.tencent.com/developer/article/2626151
- 视频教程:https://cloud.tencent.com/developer/video/85055
**企业微信**:
- 快速接入指南:https://cloud.tencent.com/developer/article/2625147
- 视频教程:https://cloud.tencent.com/developer/video/85003
**钉钉**:
- 快速接入指南:https://cloud.tencent.com/developer/article/2626553
- 视频教程:https://cloud.tencent.com/developer/video/85055
**QQ**:
- 快速接入指南:https://cloud.tencent.com/developer/article/2626045
- 视频教程:https://cloud.tencent.com/developer/video/85003
### 社区资源
- OpenClaw社区:https://docs.openclaw.ai
- 交流群:扫码加入
- 问题反馈:GitHub Issues
---
**下一章预告**:第10章将学习API服务封装,包括Banana绘图集成、Notion数据同步、视频生成服务、语音合成接入等内容。
## 9.1.16 多机器人多 Agent 模式:打造你的 AI 助手团队
> 💡 **完整教程**:本节详细介绍如何使用多 Gateway + 多飞书机器人架构,打造专业的 AI 助手团队。
### 9.1.16.1 为什么需要多 Agent?
作为超级个体创业者,你可能需要不同类型的 AI 助手来处理不同的工作:
- **主助理**:使用最强大的模型(Claude Opus)处理复杂任务
- **内容创作助手**:专注于文章写作、文案创作
- **技术开发助手**:处理代码开发、技术问题
- **AI 资讯助手**:快速获取和整理 AI 行业动态
传统的单 Agent 模式需要频繁切换模型和上下文,效率低下。多 Agent 模式让你可以同时拥有多个专业助手,各司其职。
### 9.1.16.2 实现方案对比
#### 方案一:单 Gateway + Bindings(不推荐)
```json
{
"bindings": [
{
"agentId": "main-agent",
"match": {
"channel": "feishu",
"peer": {
"kind": "group",
"id": "oc_xxx"
}
}
}
]
}
```text
**问题**:
- ❌ OpenClaw 2026.3.2 的 bindings 功能不稳定
- ❌ peer.id 匹配经常失败
- ❌ 所有群组都路由到同一个 agent
- ❌ 需要 `/reset` + `/agent` 命令手动切换
#### 方案二:多 Gateway + 多飞书机器人(推荐)✅
**核心思路**:
- 创建 4 个飞书机器人应用
- 启动 4 个独立的 OpenClaw Gateway
- 每个 Gateway 连接一个飞书机器人
- 每个 Gateway 使用不同的 Agent 和模型
**优势**:
- ✅ 完全独立,互不干扰
- ✅ 直接私聊不同机器人即可切换 agent
- ✅ 不需要群组配置
- ✅ 不需要手动切换命令
- ✅ 配置清晰,易于管理
- ✅ 可以独立重启某个 Gateway
### 9.1.16.3 架构设计
#### 整体架构┌─────────────────────────────────────────────────────────┐ │ 飞书 (Feishu) │ ├─────────────────────────────────────────────────────────┤ │ 机器人1: 主助理 机器人2: 内容创作助手 │ │ 机器人3: 技术开发助手 机器人4: AI资讯助手 │ └─────────────────────────────────────────────────────────┘ ↓ WebSocket ┌─────────────────────────────────────────────────────────┐ │ OpenClaw Gateway 层 │ ├──────────────┬──────────────┬──────────────┬────────────┤ │ Gateway 1 │ Gateway 2 │ Gateway 3 │ Gateway 4 │ │ 端口: 18789 │ 端口: 18790 │ 端口: 18791 │ 端口: 18792│ │ Profile: │ Profile: │ Profile: │ Profile: │ │ main- │ content- │ tech-dev │ ai-news │ │ assistant │ creator │ │ │ └──────────────┴──────────────┴──────────────┴────────────┘ ↓ ┌─────────────────────────────────────────────────────────┐ │ Agent 层 │ ├──────────────┬──────────────┬──────────────┬────────────┤ │ main-agent │ content-agent│ tech-agent │ainews-agent│ │ Claude Opus │ Claude Sonnet│ Claude Sonnet│ Gemini 2.5 │ │ 4.6 Thinking │ 4.5 │ 4.5 Thinking │ Flash │ └──────────────┴──────────────┴──────────────┴────────────┘
text
#### Profile 隔离机制

使用 `--profile <name>` 参数,OpenClaw 会:
- 配置文件:`~/.openclaw-<name>/openclaw.json`
- 状态数据:`~/.openclaw-<name>/`
- 独立端口:18789, 18790, 18791, 18792
- 独立会话:完全隔离的上下文

### 9.1.16.4 配置步骤

#### 第一步:创建飞书机器人应用

在飞书开放平台创建 4 个机器人应用:

1. **主助理**
   - 应用名称:主助理
   - 描述:处理复杂任务的主力助手
   - 获取 App ID 和 App Secret

2. **内容创作助手**
   - 应用名称:内容创作助手
   - 描述:专注内容创作和文案写作
   - 获取 App ID 和 App Secret

3. **技术开发助手**
   - 应用名称:技术开发助手
   - 描述:处理代码开发和技术问题
   - 获取 App ID 和 App Secret

4. **AI资讯助手**
   - 应用名称:AI资讯助手
   - 描述:快速获取 AI 行业资讯
   - 获取 App ID 和 App Secret

**重要配置**:
- 启用机器人能力
- 配置事件订阅:选择"长连接"模式
- 添加权限:消息接收、消息发送

#### 第二步:配置 Agent

创建 4 个 Agent 配置目录:

```bash
mkdir -p agent-configs/{main-agent,content-agent,tech-agent,ainews-agent}
```text
为每个 Agent 创建配置文件:

**agent-configs/main-agent/USER.md**:

```markdown
# 用户信息

- 姓名:Maynor
- 职业:超级个体创业者
- 工作领域:AI 技术、内容创作、技术开发
```text
**agent-configs/main-agent/SOUL.md**:

```markdown
# Agent 身份

你是 Maynor 的主助理,负责处理各类复杂任务。使用 Claude Opus 4.6 Thinking 模型,提供最高质量的服务。
```text
类似地为其他 3 个 Agent 创建配置文件。

#### 第三步:运行配置脚本

使用自动化脚本创建多 Gateway 配置:

```bash
# 下载配置脚本
curl -O https://example.com/setup-multi-gateway.sh
chmod +x setup-multi-gateway.sh

# 运行配置脚本
./setup-multi-gateway.sh
```text
脚本会自动:
1. 停止当前 Gateway
2. 备份现有配置
3. 创建 4 个独立的 Profile 配置
4. 生成管理脚本

#### 第四步:启动所有 Gateway

```bash
# 启动所有 Gateway
./start-all-gateways.sh

# 检查状态
./check-gateways.sh

# 验证配置
./verify-setup.sh
```text
### 9.1.16.5 使用方法

#### 直接私聊机器人

这是最简单的使用方式:

1. **处理复杂任务**
   - 在飞书中搜索"主助理"机器人
   - 直接发送消息
   - 自动使用 Claude Opus 4.6 Thinking

2. **创作内容**
   - 搜索"内容创作助手"机器人
   - 发送写作需求
   - 自动使用 Claude Sonnet 4.5

3. **开发代码**
   - 搜索"技术开发助手"机器人
   - 发送技术问题
   - 自动使用 Claude Sonnet 4.5 Thinking

4. **获取资讯**
   - 搜索"AI资讯助手"机器人
   - 请求最新动态
   - 自动使用 Gemini 2.5 Flash(快速响应)

#### 在群组中使用(可选)

如果需要在群组中使用:

1. 将对应的机器人添加到群组
2. @ 机器人发送消息
3. 每个群组可以添加多个机器人,灵活切换

**建议**:
- 工作群:添加主助理 + 技术开发助手
- 内容创作群:添加内容创作助手
- 资讯群:添加 AI资讯助手

### 9.1.16.6 管理和维护

#### 日常管理

```bash
# 查看所有 Gateway 状态
./check-gateways.sh

# 查看实时日志
tail -f logs-main-assistant.log
tail -f logs-content-creator.log
tail -f logs-tech-dev.log
tail -f logs-ai-news.log

# 查看所有日志
tail -f logs-*.log
```text
#### 重启 Gateway

```bash
# 重启所有
./stop-all-gateways.sh
sleep 2
./start-all-gateways.sh

# 重启单个
ps aux | grep "openclaw.*--profile main-assistant"
kill <PID>
./start-main-assistant.sh
```text
#### 修改配置

```bash
# 编辑配置
vim ~/.openclaw-main-assistant/openclaw.json

# 验证配置
jq . ~/.openclaw-main-assistant/openclaw.json

# 重启生效
# (停止并重启对应的 Gateway)
```text
#### 监控资源

```bash
# 查看内存占用
ps aux | grep openclaw-gateway | awk '{print $4, $11}'

# 查看 CPU 占用
ps aux | grep openclaw-gateway | awk '{print $3, $11}'

# 查看端口占用
lsof -i :18789
lsof -i :18790
lsof -i :18791
lsof -i :18792
```text
### 9.1.16.7 实战案例

#### 案例一:内容创作工作流

**场景**:写一篇技术文章

1. **构思阶段**
   - 私聊"主助理":讨论文章主题和大纲
   - 使用 Claude Opus 进行深度思考

2. **写作阶段**
   - 私聊"内容创作助手":撰写文章内容
   - 使用 Claude Sonnet 快速生成

3. **代码示例**
   - 私聊"技术开发助手":编写代码示例
   - 使用 Claude Sonnet Thinking 确保代码质量

4. **资讯补充**
   - 私聊"AI资讯助手":获取最新技术动态
   - 使用 Gemini Flash 快速检索

#### 案例二:技术开发工作流

**场景**:开发一个新功能

1. **需求分析**
   - 主助理:分析需求,设计架构

2. **代码实现**
   - 技术开发助手:编写代码,调试问题

3. **文档编写**
   - 内容创作助手:编写技术文档

4. **技术调研**
   - AI资讯助手:查找相关技术资料

#### 案例三:日常工作场景

**上午 9:00 - 规划工作**
- 主助理:制定今天的工作计划

**上午 10:00 - 写作**
- 内容创作助手:撰写文章

**下午 2:00 - 开发**
- 技术开发助手:编写代码

**下午 4:00 - 学习**
- AI资讯助手:了解行业动态

**晚上 8:00 - 总结**
- 主助理:总结今天的工作

### 9.1.16.8 性能和成本

#### 资源占用

- **内存**:每个 Gateway 约 400MB
- **总内存**:4 个 Gateway 约 1.6GB
- **CPU**:空闲时几乎为 0,处理时根据任务而定
- **磁盘**:配置文件和日志约 100MB

#### 成本分析

假设使用自建 API 代理:

| Agent | 模型 | 用途 | 月使用量 | 月成本 |
|-------|------|------|----------|--------|
| main-agent | Claude Opus 4.6 | 复杂任务 | 100万 tokens | $15 |
| content-agent | Claude Sonnet 4.5 | 内容创作 | 200万 tokens | $6 |
| tech-agent | Claude Sonnet 4.5 | 技术开发 | 150万 tokens | $4.5 |
| ainews-agent | Gemini 2.5 Flash | 资讯获取 | 300万 tokens | $0 |
| **总计** | - | - | 750万 tokens | **$25.5** |

**成本优化建议**:
- 简单任务使用 Gemini Flash(免费)
- 复杂任务才使用 Claude Opus
- 内容创作使用 Claude Sonnet(性价比高)

### 9.1.16.9 故障排查

#### Gateway 启动失败

**症状**:运行 `./start-all-gateways.sh` 后,`./check-gateways.sh` 显示进程未运行

**排查步骤**:

```bash
# 1. 查看日志
tail -50 logs-main-assistant.log

# 2. 检查配置
jq . ~/.openclaw-main-assistant/openclaw.json

# 3. 检查端口占用
lsof -i :18789

# 4. 运行 doctor
openclaw --profile main-assistant doctor
```text
**常见问题**:
- 配置文件格式错误:运行 `jq` 验证
- 端口被占用:更换端口或停止占用进程
- 飞书配置错误:检查 App ID 和 App Secret

#### 机器人无响应

**症状**:在飞书中 @ 机器人,没有回复

**排查步骤**:

```bash
# 1. 检查 Gateway 是否运行
./check-gateways.sh

# 2. 查看实时日志
tail -f logs-main-assistant.log

# 3. 检查飞书连接
grep "WebSocket client started" logs-main-assistant.log
```text
**常见原因**:
- Gateway 未启动:运行 `./start-all-gateways.sh`
- 飞书连接断开:检查网络,重启 Gateway
- 配置错误:验证飞书 App ID 和 Secret

#### 使用了错误的 Agent

**症状**:私聊"内容创作助手",但使用的是 Claude Opus 模型

**原因**:配置文件中 Agent 设置错误

**解决**:

```bash
# 检查配置
jq '.agents.list[0].id, .agents.list[0].model.primary' \
  ~/.openclaw-content-creator/openclaw.json

# 应该输出:
# "content-agent"
# "local-antigravity/claude-sonnet-4-5"
```text
### 9.1.16.10 高级技巧

#### 技巧一:使用 tmux 管理

```bash
# 创建 tmux 会话
tmux new -s openclaw

# 分割窗口
Ctrl+b %  # 垂直分割
Ctrl+b "  # 水平分割

# 在不同窗口中运行不同的 Gateway
./start-main-assistant.sh
./start-content-creator.sh
./start-tech-dev.sh
./start-ai-news.sh

# 查看所有日志
tail -f logs-*.log
```text
#### 技巧二:配置开机自启动

使用 launchd(macOS):

```bash
# 创建 plist 文件
cat > ~/Library/LaunchAgents/com.openclaw.main-assistant.plist << 'EOF'
<?xml version="1.0" encoding="UTF-8"?>
<!DOCTYPE plist PUBLIC "-//Apple//DTD PLIST 1.0//EN" "http://www.apple.com/DTDs/PropertyList-1.0.dtd">
<plist version="1.0">
<dict>
  <key>Label</key>
  <string>com.openclaw.main-assistant</string>
  <key>ProgramArguments</key>
  <array>
    <string>/usr/local/bin/openclaw</string>
    <string>--profile</string>
    <string>main-assistant</string>
    <string>gateway</string>
    <string>run</string>
  </array>
  <key>RunAtLoad</key>
  <true/>
  <key>KeepAlive</key>
  <true/>
</dict>
</plist>
EOF

# 加载服务
launchctl load ~/Library/LaunchAgents/com.openclaw.main-assistant.plist
```text
#### 技巧三:日志轮转

```bash
# 创建日志轮转脚本
cat > rotate-logs.sh << 'EOF'
#!/bin/zsh
for log in logs-*.log; do
  if [ -f "$log" ] && [ $(stat -f%z "$log") -gt 10485760 ]; then
    mv "$log" "$log.$(date +%Y%m%d_%H%M%S)"
    touch "$log"
  fi
done
EOF

chmod +x rotate-logs.sh

# 添加到 crontab(每小时执行)
crontab -e
# 添加:0 * * * * /path/to/rotate-logs.sh
```text
### 9.1.16.11 总结

多 Gateway + 多飞书机器人的方案是目前最稳定、最简单的多 Agent 实现方式:

**核心优势**:
- ✅ 直接私聊不同机器人,自动使用对应 agent
- ✅ 完全独立,互不干扰
- ✅ 不需要复杂的 bindings 配置
- ✅ 不需要手动切换命令
- ✅ 配置清晰,易于管理

**适用场景**:
- 超级个体创业者
- 需要多个专业助手
- 不同任务使用不同模型
- 追求稳定性和可靠性

**下一步**:
1. 创建飞书机器人应用
2. 运行配置脚本
3. 启动所有 Gateway
4. 开始使用你的 AI 助手团队!

---

## 9.1.17 多 Agent 配置(传统方式)

> ⚠️ **注意**:本节介绍的是传统的单 Gateway + Bindings 方式,推荐使用上面的多 Gateway 方案。

### 什么是多 Agent?

多 Agent 配置允许:
- 每个飞书机器人使用不同的 Agent
- 每个 Agent 使用不同的模型
- 每个 Agent 使用独立的工作空间
- 每个 Agent 有独立的配置和上下文

### 9.1.17.1 配置结构(传统方式)

```json
{
  "agents": {
    "list": [
      {
        "id": "agent-id",
        "workspace": "/path/to/workspace",
        "model": {
          "primary": "provider/model"
        }
      }
    ],
    "defaults": {
      "compaction": { "mode": "safeguard" },
      "maxConcurrent": 4
    }
  },
  "channels": {
    "feishu": {
      "accounts": {
        "bot-name": { ... }
      }
    }
  },
  "bindings": [
    {
      "agentId": "agent-id",
      "match": {
        "channel": "feishu",
        "peer": {
          "kind": "dm",
          "id": "ou_user_id"
        }
      }
    }
  ]
}
```text
### 9.1.17.2 实战案例:4个专业助手(传统方式)

**场景**:一人公司,需要不同的专业助手处理不同任务。

**配置示例**:

```json
{
  "agents": {
    "list": [
      {
        "id": "main-agent",
        "workspace": "/Users/username/clawd",
        "model": {
          "primary": "anthropic/claude-sonnet-4"
        }
      },
      {
        "id": "content-agent",
        "workspace": "/Users/username/clawd/content",
        "model": {
          "primary": "anthropic/claude-sonnet-4"
        }
      },
      {
        "id": "tech-agent",
        "workspace": "/Users/username/clawd/tech",
        "model": {
          "primary": "anthropic/claude-sonnet-4"
        }
      },
      {
        "id": "ainews-agent",
        "workspace": "/Users/username/clawd/ainews",
        "model": {
          "primary": "google/gemini-2-flash"
        }
      }
    ],
    "defaults": {
      "compaction": { "mode": "safeguard" },
      "maxConcurrent": 4,
      "subagents": { "maxConcurrent": 8 }
    }
  },
  "channels": {
    "feishu": {
      "accounts": {
        "main-assistant": {
          "appId": "cli_main_xxx",
          "appSecret": "xxx",
          "botName": "主助理"
        },
        "content-creator": {
          "appId": "cli_content_xxx",
          "appSecret": "xxx",
          "botName": "内容创作助手"
        },
        "tech-dev": {
          "appId": "cli_tech_xxx",
          "appSecret": "xxx",
          "botName": "技术开发助手"
        },
        "ai-news": {
          "appId": "cli_news_xxx",
          "appSecret": "xxx",
          "botName": "AI资讯助手"
        }
      }
    }
  },
  "bindings": [
    {
      "agentId": "main-agent",
      "match": {
        "channel": "feishu",
        "peer": { "kind": "dm", "id": "ou_xxx1" }
      }
    },
    {
      "agentId": "content-agent",
      "match": {
        "channel": "feishu",
        "peer": { "kind": "dm", "id": "ou_xxx2" }
      }
    },
    {
      "agentId": "tech-agent",
      "match": {
        "channel": "feishu",
        "peer": { "kind": "dm", "id": "ou_xxx3" }
      }
    },
    {
      "agentId": "ainews-agent",
      "match": {
        "channel": "feishu",
        "peer": { "kind": "dm", "id": "ou_xxx4" }
      }
    }
  ]
}
```text
### 9.1.17.3 获取用户 ID(传统方式)

**方法1:通过日志获取(推荐)**

```bash
# 1. 启动网关并查看日志
openclaw gateway restart
openclaw logs --follow

# 2. 在飞书中给每个机器人发送消息

# 3. 在日志中查找 open_id
# 格式:ou_xxxxxxxxxxxxxxxx
```text
**日志示例**:
[feishu] Received message from ou_18d36d8a49c010dfe20ace2a29250c04 [feishu] Bot: 主助理
text
**方法2:通过配对请求获取**
```bash
openclaw pairing list feishu
# 输出示例:
# Pending pairing requests:
# - Code: ABC123, User: ou_xxx, Bot: 主助理
```text
### 9.1.17.4 配置步骤(传统方式)
**步骤1:创建工作空间目录**
```bash
mkdir -p /Users/username/clawd/content
mkdir -p /Users/username/clawd/tech
mkdir -p /Users/username/clawd/ainews
```text
**步骤2:获取所有用户 ID**
按照上面的方法,获取每个机器人对应的用户 ID。
**步骤3:更新配置文件**
将获取到的用户 ID 填入 `bindings` 部分。
**步骤4:应用配置**
```bash
# 备份现有配置
cp ~/.openclaw/openclaw.json ~/.openclaw/openclaw.json.backup
# 应用新配置
cp your-config.json ~/.openclaw/openclaw.json
# 验证配置
openclaw doctor
# 重启网关
openclaw gateway restart
```text
**步骤5:验证运行**
```bash
# 查看 Agent 状态
openclaw doctor
# 应该看到:
# Agents: main-agent (default), content-agent, tech-agent, ainews-agent
# Session store: 4 entries
# 查看日志
openclaw logs --follow | grep bindings
# 应该看到:
# [bindings] Matched agent: main-agent for user ou_xxx
```text
### 9.1.17.5 配置注意事项
**⚠️ 重要:agents.list 配置限制**
这是最常见的配置错误!`agents.list` 中的每个 Agent 只能包含以下字段:
```json
{
"id": "agent-id", // ✅ Agent 标识符(必填)
"workspace": "/path", // ✅ 工作空间路径(必填)
"model": { "primary": "" } // ✅ 使用的模型(可选)
// ❌ 不能包含 compaction
// ❌ 不能包含 maxConcurrent
// ❌ 不能包含 subagents
// ❌ 不能包含 models
}
```text
**错误示例(会导致配置验证失败)**:
```json
{
"agents": {
"list": [
{
"id": "main-agent",
"workspace": "/path",
"compaction": { "mode": "safeguard" }, // ❌ 错误!
"maxConcurrent": 4 // ❌ 错误!
}
]
}
}
```text
**正确示例**:
```json
{
"agents": {
"list": [
{
"id": "main-agent",
"workspace": "/path",
"model": { "primary": "provider/model" } // ✅ 正确
}
],
"defaults": {
"compaction": { "mode": "safeguard" }, // ✅ 在这里配置
"maxConcurrent": 4, // ✅ 在这里配置
"subagents": { "maxConcurrent": 8 } // ✅ 在这里配置
}
}
}
```text
**2. 通用配置必须放在 agents.defaults**:
所有 Agent 共享的配置项必须放在 `agents.defaults` 中,包括:
- `compaction` - 上下文压缩策略
- `maxConcurrent` - 最大并发数
- `subagents` - 子 Agent 配置
- `models` - 额外的模型配置
```json
{
"defaults": {
"model": {
"primary": "default-provider/default-model"
},
"workspace": "/default/workspace",
"compaction": { "mode": "safeguard" },
"maxConcurrent": 4,
"subagents": { "maxConcurrent": 8 }
}
}
```text
**3. Bindings 顺序很重要**:
OpenClaw 会按顺序匹配 bindings,第一个匹配的规则会被使用。
```json
"bindings": [
// 1. 最具体的匹配(特定用户)
{ "agentId": "main-agent", "match": { "peer": { "id": "ou_xxx" } } },
// 2. 较具体的匹配(特定群组)
{ "agentId": "tech-agent", "match": { "peer": { "kind": "group" } } },
// 3. 最后是默认匹配
{ "agentId": "default-agent", "match": { "channel": "feishu" } }
]
```text
**4. 用户 ID 是唯一的**:
每个飞书用户只能绑定到一个 Agent。
### 故障排查
**问题1:配置验证失败 - agents.list 包含不支持的字段**
```bash
# 错误信息
Config invalid
File: ~/.openclaw/openclaw.json
Problem:
- agents.list.0: Unrecognized keys: "compaction", "maxConcurrent"
- agents.list.1: Unrecognized keys: "compaction", "maxConcurrent"
- agents.list.2: Unrecognized keys: "compaction", "maxConcurrent"
- agents.list.3: Unrecognized keys: "compaction", "maxConcurrent"
Run: openclaw doctor --fix
```text
**原因**:`agents.list` 中的 Agent 配置包含了只能在 `agents.defaults` 中使用的字段。
**解决方案**:
```bash
# 方法1:自动修复(推荐)
openclaw doctor --fix
# 方法2:手动修复
# 编辑配置文件,将 compaction 和 maxConcurrent 从 agents.list 移到 agents.defaults
```text
**修复前**:
```json
{
"agents": {
"list": [
{
"id": "main-agent",
"workspace": "/path",
"compaction": { "mode": "safeguard" }, // ❌ 错误位置
"maxConcurrent": 4 // ❌ 错误位置
}
]
}
}
```text
**修复后**:
```json
{
"agents": {
"list": [
{
"id": "main-agent",
"workspace": "/path",
"model": { "primary": "provider/model" }
}
],
"defaults": {
"compaction": { "mode": "safeguard" }, // ✅ 正确位置
"maxConcurrent": 4 // ✅ 正确位置
}
}
}
```text
**验证修复**:
```bash
# 验证配置
openclaw doctor
# 应该看到:
# ✅ Config valid
# ✅ 4 agents configured
# ✅ 4 bindings configured
```text
**问题2:Bindings 不生效**
```bash
# 检查用户 ID 是否正确
openclaw logs --follow | grep "ou_"
# 查看 bindings 匹配情况
openclaw logs --follow | grep bindings
```text
**问题3:找不到用户 ID**
```bash
# 使用 debug 级别日志
openclaw logs --follow --level debug
# 或查看配对请求
openclaw pairing list feishu
```text
**问题4:配置修改后运行 openclaw doctor 报错**
```bash
# 错误信息
Unknown config keys:
- agents.list[0].compaction
- agents.list[0].maxConcurrent
- agents.list[1].compaction
- agents.list[1].maxConcurrent
...
Run "openclaw doctor --fix" to remove these keys.
```text
**解决方案**:
```bash
# 运行自动修复
openclaw doctor --fix
# 验证配置
openclaw doctor
# 重启网关
openclaw gateway restart
# 查看状态
openclaw gateway status
```text
**问题5:版本不匹配警告**
```bash
# 警告信息
Config was last written by a newer OpenClaw (2026.2.6-3);
current version is 2026.2.1-zh.3.
Run "openclaw doctor --fix" to apply changes.
```text
**说明**:这是正常的版本提示,不影响使用。如果想消除警告:
```bash
openclaw doctor --fix
```text
### 9.1.17.6 配置对比
| 特性 | 单 Agent 模式 | 多 Agent 模式 |
|------|--------------|--------------|
| 配置复杂度 | 简单 | 复杂 |
| 模型选择 | 所有机器人相同 | 每个机器人不同 |
| 工作空间 | 共享 | 隔离 |
| 需要 bindings | ❌ | ✅ |
| 需要用户 ID | ❌ | ✅ |
| 适用场景 | 简单使用 | 专业分工 |
### 9.1.17.7 使用建议
**推荐使用多 Agent 的场景**:
- ✅ 需要不同机器人使用不同模型
- ✅ 需要隔离工作空间
- ✅ 需要独立配置和上下文
- ✅ 专业分工明确
**推荐使用单 Agent 的场景**:
- ✅ 配置简单易维护
- ✅ 所有机器人使用相同模型
- ✅ 不需要隔离工作空间
- ✅ 快速开始使用
---
## 9.1.18 本地多 Agent 管理(无需绑定 IM 平台)
> 💡 **重要提示**:多 Agent 管理不仅可以用于飞书等 IM 平台,也完全支持本地使用。如果你不需要绑定飞书机器人,可以通过 Web UI、命令行或 TUI 界面直接使用多个 Agent。
### 本地使用方式
OpenClaw 提供了多种本地使用方式,无需配置任何 IM 平台:
#### 方式一:Web UI(推荐)
```bash
# 打开 Web 界面
openclaw dashboard
# 或直接访问
http://127.0.0.1:18789/?token=你的token
```text
**优势**:
- ✅ 图形化界面,操作直观
- ✅ 支持文件上传和下载
- ✅ 实时显示 Token 消耗
- ✅ 支持多轮对话历史
#### 方式二:命令行对话
```bash
# 直接发送消息
openclaw agent --message "你好,帮我分析一下这个项目"
# 使用管道输入
echo "帮我总结这个文件的内容" | openclaw agent --message
# 指定输出文件
openclaw agent --message "生成项目文档" --output docs.md
```text
**优势**:
- ✅ 快速执行单次任务
- ✅ 适合脚本自动化
- ✅ 可以集成到工作流中
#### 方式三:TUI 终端界面
```bash
# 启动终端交互界面
openclaw tui
```text
**优势**:
- ✅ 终端内交互式对话
- ✅ 支持多轮对话
- ✅ 适合服务器环境使用
### 本地多 Agent 配置
配置文件位置:`~/.openclaw/openclaw.json`
**配置示例**:
```json
{
"agents": {
"list": [
{
"id": "main-agent",
"workspace": "/Users/username/work",
"model": { "primary": "anthropic/claude-sonnet-4" }
},
{
"id": "content-agent",
"workspace": "/Users/username/content",
"model": { "primary": "anthropic/claude-sonnet-4" }
},
{
"id": "code-agent",
"workspace": "/Users/username/code",
"model": { "primary": "deepseek/deepseek-chat" }
},
{
"id": "research-agent",
"workspace": "/Users/username/research",
"model": { "primary": "google/gemini-2-flash" }
}
],
"defaults": {
"compaction": { "mode": "safeguard" },
"maxConcurrent": 4,
"subagents": { "maxConcurrent": 8 }
}
}
}
```text
**配置说明**:
1. **agents.list**:定义所有可用的 Agent
- `id`:Agent 标识符(必填)
- `workspace`:工作空间路径(必填)
- `model.primary`:使用的模型(可选)
2. **agents.defaults**:所有 Agent 共享的配置
- `compaction`:上下文压缩策略
- `maxConcurrent`:最大并发数
- `subagents`:子 Agent 配置
### Agent 管理命令
#### 列出所有 Agent
```bash
openclaw agents list
# 输出示例:
# Available agents:
# - main-agent (default)
# Workspace: /Users/username/work
# Model: anthropic/claude-sonnet-4
# - content-agent
# Workspace: /Users/username/content
# Model: anthropic/claude-sonnet-4
# - code-agent
# Workspace: /Users/username/code
# Model: deepseek/deepseek-chat
# - research-agent
# Workspace: /Users/username/research
# Model: google/gemini-2-flash
```text
#### 切换 Agent
```bash
# 切换到指定 Agent
openclaw agents switch content-agent
# 输出:
# Switched to agent: content-agent
# Workspace: /Users/username/content
# Model: anthropic/claude-sonnet-4
```text
#### 查看当前 Agent
```bash
# 查看当前使用的 Agent
openclaw agents current
# 输出:
# Current agent: content-agent
# Workspace: /Users/username/content
# Model: anthropic/claude-sonnet-4
```text
#### 查看 Agent 配置
```bash
# 查看指定 Agent 的配置
openclaw agents config content-agent
# 查看当前 Agent 的配置
openclaw agents config
```text
#### 查看 Agent 状态
```bash
# 查看所有 Agent 的状态
openclaw doctor
# 输出示例:
# ✅ Config valid
# ✅ 4 agents configured
# ✅ Gateway running
# ✅ Session store: 12 entries
```text
### 实战案例:4个专业助手
**场景**:个人开发者,需要不同的专业助手处理不同任务。
**配置步骤**:
**步骤1:创建工作空间目录**
```bash
mkdir -p ~/work/main
mkdir -p ~/work/content
mkdir -p ~/work/code
mkdir -p ~/work/research
```text
**步骤2:编辑配置文件**
```bash
# 备份现有配置
cp ~/.openclaw/openclaw.json ~/.openclaw/openclaw.json.backup
# 编辑配置
nano ~/.openclaw/openclaw.json
```text
将上面的配置示例粘贴进去,修改路径为你的实际路径。
**步骤3:验证配置**
```bash
# 验证配置是否正确
openclaw doctor
# 应该看到:
# ✅ Config valid
# ✅ 4 agents configured
```text
**步骤4:重启网关**
```bash
# 重启网关使配置生效
openclaw gateway restart
# 查看状态
openclaw gateway status
```text
**步骤5:使用不同的 Agent**
```bash
# 使用主助手处理通用任务
openclaw agents switch main-agent
openclaw agent --message "帮我整理今天的待办事项"
# 使用内容助手创作文章
openclaw agents switch content-agent
openclaw agent --message "帮我写一篇关于 AI 的文章"
# 使用代码助手开发项目
openclaw agents switch code-agent
openclaw agent --message "帮我优化这段 Python 代码"
# 使用研究助手搜集资料
openclaw agents switch research-agent
openclaw agent --message "帮我搜集关于量子计算的最新研究"
```text
### 使用场景对比
| 场景 | 推荐方式 | Agent 配置 | 优势 |
|------|---------|-----------|------|
| 个人本地使用 | Web UI + 多 Agent | 不同任务用不同 Agent | 工作空间隔离,模型灵活 |
| 团队协作 | 飞书 + 多 Agent | 不同机器人绑定不同 Agent | 团队成员各用各的助手 |
| 快速测试 | 命令行 + 单 Agent | 使用默认 Agent | 配置简单,快速上手 |
| 服务器环境 | TUI + 多 Agent | 不同项目用不同 Agent | 终端内交互,资源隔离 |
### 典型工作流
**场景:一人公司的日常工作流**
```bash
# 早上:使用主助手查看日程
openclaw agents switch main-agent
openclaw agent --message "显示今天的日程安排"
# 上午:使用代码助手开发项目
openclaw agents switch code-agent
openclaw agent --message "帮我实现用户登录功能"
# 中午:使用研究助手学习新技术
openclaw agents switch research-agent
openclaw agent --message "搜集 Rust 语言的学习资料"
# 下午:使用内容助手写文章
openclaw agents switch content-agent
openclaw agent --message "写一篇关于今天开发经验的博客"
# 晚上:使用主助手总结一天
openclaw agents switch main-agent
openclaw agent --message "生成今日工作总结"
```text
### 配置技巧
**技巧1:为不同任务使用不同模型**
```json
{
"agents": {
"list": [
{
"id": "chat-agent",
"workspace": "/Users/username/chat",
"model": { "primary": "anthropic/claude-sonnet-4" }
},
{
"id": "code-agent",
"workspace": "/Users/username/code",
"model": { "primary": "deepseek/deepseek-chat" }
},
{
"id": "fast-agent",
"workspace": "/Users/username/fast",
"model": { "primary": "google/gemini-2-flash" }
}
]
}
}
```text
**说明**:
- Claude Sonnet 4:通用对话和复杂任务
- DeepSeek:代码生成和技术问题
- Gemini Flash:快速响应和简单任务
**技巧2:使用别名简化切换**
```bash
# 在 ~/.zshrc 或 ~/.bashrc 中添加别名
alias oc-main='openclaw agents switch main-agent'
alias oc-code='openclaw agents switch code-agent'
alias oc-content='openclaw agents switch content-agent'
alias oc-research='openclaw agents switch research-agent'
# 使用别名快速切换
oc-code
openclaw agent --message "帮我写一个排序算法"
```text
**技巧3:为每个 Agent 配置独立的 Skills**
```bash
# 为代码助手安装开发相关的 Skills
openclaw agents switch code-agent
openclaw skill install github-integration
openclaw skill install code-review
# 为内容助手安装写作相关的 Skills
openclaw agents switch content-agent
openclaw skill install grammar-check
openclaw skill install seo-optimizer
```text
### 常见问题
**问题1:切换 Agent 后工作空间没变**
```bash
# 检查当前 Agent
openclaw agents current
# 检查配置
openclaw agents config
# 重启网关
openclaw gateway restart
```text
**问题2:找不到 Agent**
```bash
# 列出所有 Agent
openclaw agents list
# 检查配置文件
cat ~/.openclaw/openclaw.json | grep -A 5 "agents"
```text
**问题3:Agent 配置验证失败**
```bash
# 运行诊断
openclaw doctor
# 自动修复
openclaw doctor --fix
```text
### 最佳实践
1. **工作空间隔离**
- 为每个 Agent 创建独立的工作空间
- 避免不同任务的文件混在一起
2. **模型选择**
- 根据任务类型选择合适的模型
- 代码任务用 DeepSeek,通用任务用 Claude
3. **定期备份**
- 定期备份配置文件
- 使用版本控制管理配置
4. **命名规范**
- Agent ID 使用有意义的名称
- 工作空间路径清晰明确
5. **资源管理**
- 合理设置 maxConcurrent
- 定期清理不用的会话
---
## 9.12 OpenClaw Manager - 可视化管理工具
> 💡 **现代化管理界面**:OpenClaw Manager 是一个基于 React + Tailwind CSS 的 Web 管理界面,用于可视化管理多个 OpenClaw Gateway 实例。
### 9.12.1 为什么需要 OpenClaw Manager?
当你使用多 Gateway 架构(每个飞书机器人对应一个独立的 Gateway 实例)时,传统的命令行管理方式会变得繁琐。OpenClaw Manager 提供了:
**核心价值**:
- 📊 **实时监控**:一目了然查看所有 Gateway 的运行状态
- 🎮 **一键控制**:启动/停止/重启服务,无需记忆命令
- ➕ **图形化创建**:通过表单创建新 Gateway,无需手动编辑配置
- ✏️ **在线编辑**:可视化编辑 Gateway 配置和 Agent 人格
- ⚙️ **保活配置**:一键配置 launchd 保活服务
- 📝 **日志查看**:实时查看每个服务的运行日志
- 💻 **美观界面**:现代化设计,响应式布局
### 9.12.2 功能特性
#### 1. 自动发现 Gateway 实例 🔍
系统会自动扫描 `~/.openclaw-*` 目录,读取配置文件并显示所有 Gateway 实例。
**特性**:
- 自动读取端口、模型、Agent 信息
- 缓存机制(1分钟 TTL)提升性能
- 支持手动刷新发现
#### 2. 创建新 Gateway ➕
通过图形界面创建新的 Gateway 实例,无需手动编辑配置文件。
**配置项**:
**基础信息**:
- Profile ID:唯一标识符(如 `my-assistant`)
- 机器人名称:显示名称(如 `我的助手`)
- 端口号:Gateway 监听端口(建议 18789-18799)
**Agent 配置**:
- Agent ID:Agent 标识符(如 `main-agent`)
- AI 模型:
- 预设模型:Claude Opus 4.6、Claude Sonnet 4.5、Gemini 2.5 Pro 等
- 自定义模型:输入任意模型 ID(如 `gpt-4o`, `deepseek-chat`)
**飞书配置**:
- App ID:飞书应用 ID(`cli_xxxxxxxxxxxxxxxx`)
- App Secret:飞书应用密钥
**人格设定 📝**:
- SOUL.md 编辑器:使用 Markdown 定义 Agent 的角色、性格、专业领域、回答风格
**示例 SOUL.md**:
```markdown
# 技术顾问 Agent
## 角色定位
你是一个资深的技术顾问,专注于软件架构和系统设计。
## 性格特点
- 严谨、专业
- 注重细节和最佳实践
- 善于分析复杂问题
## 专业领域
- 微服务架构
- 云原生技术
- DevOps 实践
- 性能优化
## 回答风格
- 先理解需求,再提供方案
- 给出具体可行的建议
- 必要时提供代码示例和架构图
- 考虑可扩展性和维护性
```text
#### 3. 编辑 Gateway ✏️
修改现有 Gateway 的配置和人格设定。
**可修改项**:
- 机器人名称
- 端口号
- Agent ID
- AI 模型(预设或自定义)
- 飞书 App ID 和 Secret(可选)
- SOUL.md 人格设定
**注意事项**:
- Profile ID 不可修改
- 飞书密钥留空则不修改
- 修改后需要重启 Gateway 才能生效
#### 4. 删除 Gateway 🗑️
完全移除 Gateway 实例及其所有配置。
**删除内容**:
- Gateway 配置文件
- Agent 配置目录
- SOUL.md 人格文件
- launchd 保活配置(如果存在)
⚠️ **警告**:删除操作不可恢复,建议先备份重要配置。
#### 5. 服务控制 🎮
**批量操作**:
- ⚙️ 配置保活:配置 launchd 保活服务(开机自启、崩溃重启)
- ▶️ 启动所有:启动所有 Gateway 实例
- ⏹️ 停止所有:停止所有 Gateway 实例
- 🔄 重启所有:重启所有 Gateway 实例
**单个操作**:
- ✏️ 编辑:编辑 Gateway 配置
- 🗑️ 删除:删除 Gateway
- 📝 日志:查看运行日志
#### 6. 实时状态监控 📊
**显示信息**:
- 运行状态(运行中/已停止)
- 端口号
- 使用的 AI 模型
- launchd 保活状态
**状态指示**:
- 🟢 绿色:运行中
- 🔴 红色:已停止
- ⚪ 灰色:未知
**自动刷新**:每 10 秒自动刷新状态,可手动点击"刷新状态"按钮。
### 9.12.3 安装和使用
#### 安装步骤
```bash
# 1. 克隆项目
git clone https://github.com/xianyu110/openclaw-manager.git
cd openclaw-manager
# 2. 安装依赖
npm install
# 3. 启动服务(前端 + 后端)
npm start
```text
应用将在以下地址启动:
- 前端:http://localhost:3000
- 后端 API:http://localhost:3001
#### 首次使用
1. **启动应用**
```bash
npm start打开浏览器 访问 http://localhost:3000
配置保活服务
- 点击"⚙️ 配置保活"按钮
- 等待配置完成
- 服务将自动开机启动并在崩溃后重启
日常操作
查看服务状态:
- 界面会自动每 10 秒刷新状态
- 点击"刷新状态"按钮手动刷新
- 绿色指示灯表示运行中,红色表示已停止
控制服务:
- 启动所有:一键启动所有 Gateway
- 停止所有:一键停止所有 Gateway
- 重启所有:一键重启所有 Gateway
- 单个控制:在服务卡片中点击"重启"按钮
查看日志:
- 点击服务卡片中的"查看日志"按钮
- 显示最近 100 行日志
- 支持实时刷新
9.12.4 使用场景
场景 1:创建专业领域助手
需求:创建一个专注于前端开发的技术助手
步骤:
- 点击"➕ 新建 Gateway"
- 填写基础信息:
- Profile ID:
frontend-expert - 机器人名称:
前端专家 - 端口:
18793
- Profile ID:
- 配置 Agent:
- Agent ID:
frontend-agent - 模型:
Claude Sonnet 4.5 Thinking
- Agent ID:
- 展开人格编辑器,定义专业领域:
markdown
# 前端开发专家

## 角色定位
你是一个资深的前端开发工程师,精通现代前端技术栈。

## 专业领域
- React / Vue / Angular
- TypeScript
- Webpack / Vite
- CSS-in-JS / Tailwind CSS
- 性能优化
- 浏览器兼容性

## 回答风格
- 提供最新的最佳实践
- 给出可运行的代码示例
- 考虑性能和可维护性
- 推荐合适的工具和库
```text
5. 填写飞书配置
6. 点击"创建"

#### 场景 2:使用自定义模型

**需求**:使用 OpenAI 的 GPT-4o 模型

**步骤**:
1. 在创建或编辑 Gateway 时
2. 勾选"使用自定义模型"
3. 输入模型 ID: `gpt-4o`
4. 确保在 OpenClaw 主配置中已设置 OpenAI API Key

**支持的自定义模型**:
- OpenAI: `gpt-4o`, `gpt-4o-mini`, `gpt-4-turbo`
- Anthropic: `claude-3-opus-20240229`, `claude-3-sonnet-20240229`
- Google: `gemini-2.5-pro`, `gemini-2.5-flash`
- DeepSeek: `deepseek-chat`, `deepseek-coder`
- 其他兼容 OpenAI API 的模型

#### 场景 3:创建多个专业助手

**需求**:为不同团队创建专属助手

**助手配置**:

1. **产品经理助手**
   - Profile: `product-manager`
   - 模型: `Claude Opus 4.6`
   - 人格: 注重用户体验、数据分析、产品规划

2. **设计师助手**
   - Profile: `designer`
   - 模型: `Claude Sonnet 4.5`
   - 人格: 关注视觉设计、用户界面、交互体验

3. **运维工程师助手**
   - Profile: `devops-engineer`
   - 模型: `Claude Sonnet 4.5 Thinking`
   - 人格: 专注系统稳定性、自动化、监控告警

4. **数据分析师助手**
   - Profile: `data-analyst`
   - 模型: `Gemini 2.5 Pro`
   - 人格: 擅长数据处理、可视化、统计分析

### 9.12.5 高级技巧

#### 1. 人格设定最佳实践

**结构化定义**:

```markdown
# Agent 名称

## 角色定位
明确定义 Agent 的角色和定位

## 性格特点
- 列出 3-5 个核心性格特点
- 保持一致性

## 专业领域
- 列出专业技能
- 明确擅长的领域

## 回答风格
- 描述回答的方式
- 设定语气和风格

## 工作流程
1. 步骤化的工作方式
2. 确保逻辑清晰
3. 提供可操作的建议

## 限制和边界
- 明确不擅长的领域
- 设定合理的期望
```text
#### 2. 模型选择建议

**Claude Opus 4.6**:
- 最强推理能力
- 适合复杂问题分析
- 成本较高

**Claude Sonnet 4.5**:
- 平衡性能和成本
- 适合日常对话
- 推荐用于大多数场景

**Claude Sonnet 4.5 Thinking**:
- 增强的思考过程
- 适合需要深度分析的场景
- 会显示思考步骤

**Gemini 2.5 Flash**:
- 响应速度快
- 成本低
- 适合简单查询和快速响应

**DeepSeek Chat**:
- 国产模型,成本极低
- 中文能力强
- 适合日常对话和简单任务

#### 3. 端口分配建议

**推荐范围**:18789-18799

**示例分配**:
- 18789: 主助理
- 18790: 内容创作
- 18791: 技术开发
- 18792: 数据分析
- 18793: 产品设计
- 18794: 运维支持
- 18795: 客户服务
- 18796-18799: 预留

### 9.12.6 故障排查

#### 问题 1:创建 Gateway 失败

**可能原因**:
- Profile ID 已存在
- 端口已被占用
- 缺少必填字段

**解决方法**:
1. 检查错误提示
2. 使用不同的 Profile ID
3. 选择未被占用的端口
4. 确保所有必填字段已填写

#### 问题 2:Gateway 无法启动

**可能原因**:
- 配置文件格式错误
- 飞书账号配置错误
- 端口被其他程序占用

**解决方法**:
1. 检查配置文件语法
2. 验证飞书 App ID 和 Secret
3. 使用 `lsof -i :端口号` 检查端口占用
4. 查看日志文件排查错误

#### 问题 3:人格设定不生效

**可能原因**:
- SOUL.md 文件未保存
- Gateway 未重启
- Agent ID 不匹配

**解决方法**:
1. 确认 SOUL.md 已保存
2. 重启 Gateway 服务
3. 检查 Agent ID 是否正确
4. 查看 `~/.openclaw-{profile}/agent-configs/{agent}/SOUL.md`

#### 问题 4:后端无法连接

```bash
# 检查端口占用
lsof -i :3001

# 手动启动后端
npm run server
```text
#### 问题 5:前端无法访问

```bash
# 检查端口占用
lsof -i :3000

# 清除缓存重新启动
rm -rf node_modules/.vite
npm start
```text
### 9.12.7 API 文档

#### 状态查询

**GET /api/status**

获取所有服务的状态信息

响应示例:
```json
{
  "services": [
    {
      "id": "main-assistant",
      "name": "主助理",
      "port": 18789,
      "status": "running",
      "model": "Claude Opus 4.6",
      "launchd": true
    }
  ]
}
批量操作
POST /api/start-all- 启动所有 Gateway 服务POST /api/stop-all- 停止所有 Gateway 服务POST /api/restart-all- 重启所有 Gateway 服务POST /api/setup-launchd- 配置 launchd 保活服务
单个服务操作
POST /api/start/:serviceId- 启动指定的 Gateway 服务POST /api/stop/:serviceId- 停止指定的 Gateway 服务POST /api/restart/:serviceId- 重启指定的 Gateway 服务GET /api/logs/:serviceId- 获取指定服务的日志(最近 100 行)
Gateway 管理
GET /api/gateways- 获取所有 Gateway 配置POST /api/gateways- 创建新的 GatewayPUT /api/gateways/:profileId- 更新 Gateway 配置DELETE /api/gateways/:profileId- 删除 Gateway
9.12.8 最佳实践
1. 命名规范
Profile ID:
- 使用小写字母和连字符
- 描述性命名
- 例如:
tech-support,content-writer
Agent ID:
- 与 Profile ID 保持一致
- 添加
-agent后缀 - 例如:
tech-support-agent
2. 人格设定
清晰明确:
- 使用简洁的语言
- 避免模糊的描述
- 提供具体的例子
保持一致:
- 人格特点要统一
- 回答风格要稳定
- 避免矛盾的设定
定期优化:
- 根据使用反馈调整
- 不断完善人格设定
- 测试不同的配置
3. 安全建议
保护敏感信息:
- 不要在 SOUL.md 中包含密钥
- 定期更换飞书 App Secret
- 限制 Gateway 的网络访问
备份配置:
- 定期备份
~/.openclaw-*目录 - 保存重要的 SOUL.md 文件
- 记录配置变更
9.12.9 项目信息
GitHub 仓库:https://github.com/xianyu110/openclaw-manager
技术栈:
- 前端:React 18 + Tailwind CSS + Vite
- 后端:Express + Node.js
- 状态管理:React Hooks
- 样式:Tailwind CSS
许可证:MIT
作者:Maynor (@xianyu110)
贡献: 欢迎提交 Issue 和 Pull Request!
9.13 更多 OpenClaw 可视化管理工具
除了 OpenClaw Manager,社区还有以下两款优秀的可视化工具可选:
9.13.1 ClawX —— 开源 AI 研究助手
项目地址:https://clawx.dev/ | GitHub:https://github.com/ValueCell-ai/ClawX
ClawX 是由 ValueCell 团队开发的开源桌面应用,在本地运行,专注于 AI 自主任务执行和多平台通知推送。
核心功能:
| 功能 | 说明 |
|---|---|
| 24/7 自主运行 | 持续监控和执行任务,无需人工干预 |
| 20+ 通讯平台通知 | 支持 WhatsApp、Telegram、Slack、Discord 等 |
| 数据聚合 | 跨多个来源进行网页抓取和数据收集 |
| 计划任务 | 基于 Cron 的定时监控功能 |
| 多 AI 供应商 | 兼容 OpenAI、Anthropic、Google 等 10+ 个提供商 |
技术特点:
- TypeScript + React 开发,支持 macOS / Windows / Linux
- 本地优先存储,数据不上云
- 兼容 OpenClaw 生态 55+ 扩展技能
- MIT 开源,完全免费,只需支付 AI 提供商 API 费用
获取方式:访问 GitHub Releases 下载对应平台安装包。
9.13.2 ClawPanel —— OpenClaw 可视化管理面板
项目地址:https://claw.qt.cool/ | GitHub:https://github.com/qingchencloud/clawpanel
ClawPanel 是基于 Tauri v2 构建的跨平台桌面管理面板(当前版本 v0.7.0),专为 OpenClaw Gateway 和多 Agent 日常管理而设计。
核心功能:
| 功能 | 说明 |
|---|---|
| Dashboard 监控 | 实时查看 Gateway 状态、服务状态、Agent 数量、模型池 |
| AI 对话界面 | 多模型流式对话,WebSocket 连接 Gateway |
| 模型配置 | 统一管理 OpenAI、DeepSeek、Kimi 等多个 AI 服务商 |
| 记忆管理 | 可视化编辑 Agent 工作记忆、归档、核心配置文件 |
| 多 Agent 管理 | 创建和管理多个 Agent,工作空间隔离 |
| 工具权限控制 | 细粒度工具权限管理,Token/密码认证 |
| 内置 AI 助手 | 一键安装 OpenClaw、配置诊断、自动化故障排查 |
平台支持:
- macOS(Apple Silicon + Intel)
- Windows(.exe / .msi)
- Linux(AppImage / .deb)
获取方式:访问 GitHub Releases 下载,MIT 开源免费。
9.13.3 三款工具对比
| 工具 | 定位 | 适合场景 |
|---|---|---|
| OpenClaw Manager | Web 管理界面,多 Gateway 管理 | 多飞书机器人、多 Gateway 场景 |
| ClawX | 桌面应用,自主任务 + 多平台通知 | 定时任务、数据监控、推送通知 |
| ClawPanel | 桌面管理面板,全功能可视化 | 日常管理 Gateway、多 Agent、模型配置 |
三款工具均免费开源,可以根据自己的使用场景选择或组合使用。
📝 本章小结
通过本章学习,你已经掌握:
- 飞书Bot配置:完整的飞书机器人创建和配置流程
- 企业微信Bot:企业微信机器人的配置方法
- 钉钉Bot配置:钉钉机器人的接入步骤
- QQ Bot配置:QQ机器人的详细配置
- Discord Bot:Discord机器人的参考配置
- 平台对比:各平台的功能对比和选择建议
- 多Agent配置:高级的多Agent管理和配置
- 本地多Agent:无需绑定IM平台的本地使用
- OpenClaw Manager:可视化管理工具的使用
- ClawX / ClawPanel:更多开源可视化管理工具选择
🎯 实战练习
- 配置一个飞书机器人并测试基本功能
- 尝试配置多个Agent,为不同场景使用不同模型
- 使用 OpenClaw Manager创建和管理多个Gateway
- 为每个Agent定制专属的人格设定
- 配置launchd保活服务,实现开机自启
- 试用 ClawPanel 或 ClawX,找到最适合自己的管理方式
💡 进阶建议
- 探索更多IM平台的集成方式
- 优化Agent的人格设定,提升使用体验
- 使用 OpenClaw Manager / ClawPanel 简化日常管理
- 为团队成员创建专属的AI助手
- 定期备份配置,避免数据丢失
下一章预告:第10章将学习API集成,包括如何对接各种第三方服务,实现更强大的自动化功能。
返回目录:README